
Runner’s Groin / Hip Pain Guide
VIDEO REHAB GUIDE SERIES
Intro and Author Information
Hey I’m Dr. Sebastian Gonzales.
While I don’t pretend to know everything, I do know what my strong points are. I have extensive experience in the timely rehabilitation of hip impingement, Hip Flexor Syndrome, labral irritation, IT Band Syndrome, hip tendonitis, tendinosis and more.
In this guide, I’ll be sharing how to find relief from pain while running, in addition to how to build a buffer to decrease probably of the ache/ pain from returning. I don’t have secrets per se, but I have things that work pretty well.
Before you start reading/ watching, please read the medical disclaimer.
DISCLAIMER
This publication is intended to promote broad consumer understanding of the current state of various health topics as of the date of publication. The information, including but not limited to, text, graphics, images, descriptions of exercises, and other material contained in this publication are for informational purposes only. The content of this publication does not constitute advice or guarantee an outcome.
The information contained in this publication has not been evaluated by the FDA. The information in this publication is not intended to treat or diagnose any medical conditions or symptoms. INFORMATION CONTAINED IN THIS PUBLICATION SHOULD NOT BE USED TO SELF-DIAGNOSE OR SELF-TREAT ANY HEALTH-RELATED CONDITION.
This publication is not intended to be a substitute for professional chiropractic or medical advice, diagnosis, or treatment. Undertaking a new exercise regimen includes some risk. Always seek the advice of your physician or other qualified healthcare provider with any questions you may have regarding a medical condition or treatment and before undertaking a new health care regimen or exercise regimen.
Never disregard professional chiropractic or medical advice or treatment based on information you read in this publication. Never delay seeking professional chiropractic or medical advice or treatment based on information you read in this publication.
Reading this publication, or any part of this publication, does not establish a professional relationship with Dr. Sebastian Gonzales, Performance Place Sports Care, or any member of the Performance Place Sports Care staff. Any chiropractic or medical decision, healthcare decision, or healthcare related decision should be made in consultation with your qualified healthcare provider.
Reference within this publication to any specific commercial or non-commercial product, process, or service by trade name or trademark, manufacturer, or otherwise does not constitute or imply an endorsement or recommendation.
Citations to other sources are provided for your convenience. Dr. Sebastian Gonzales and Performance Place Sports Care, individually and collectively, accept no liability for any cited sources or the contents of any cited source, which may change without notice. If you choose to read or further research any source cited in this publication, you do so at your own risk.
In the event of a medical emergency, immediately contact your doctor or call 9-1-1.
Groin Pain Theory
You probably have many friends who have an on-going issue that keeps them from enjoying running to the fullest. Hip flexor tension, achy piriformis, tight hamstrings, IT band pain, lower back stiffness, and knee pain at the top of the list with active people, runners included in this list. You may have other friends who have fallen prey to an injury that even is aggravated with every day, non-running activities.
The reduction of pain is simple in most situations. But building a buffer is where rehab clinics tend to miss the boat, or the patient misunderstands what the clinician expects them to do.
Building a buffer is critical in being able to do some pretty cool things with your body after sustaining an ache or pain. The great thing is your body wants to build a buffer. It is ready, but are you?
Building a buffer takes hard work, but as a runner, you’re used to hard work. It will just be a different type of work. The fact of the matter is, people have recurring issues because prolonged rest, and avoidance of running, leave the body UNPREPARED for reintroduction of sport.
Building a buffer is about preparing a sensitive area to load again. Running creates loads on joints and muscles, good recovery programs account for the reintroduction of that sport-specific load. The creation of the right program is easy. But doing the work is hard. It takes allocation of time, accountability, and paying attention to coaching cues given by the rehab specialist.
In most cases, a full return to running is possible after many types of problems:
- Hip Flexor Syndrome
- Hip Impingement
- Adductor Strains
- Piriformis Syndrome
- SI Joint Sprain
- Plantar Fasciitis
- Achilles Tendonitis
- Hamstring Strains
- Lower Back Pain
- TFL Tension
- IT Band Syndrome
- Runner’s Knee
- Shin Splints
- Scar Tissue
- Weak Core
- Poor Movement Patterns
The list can go on and on!
Even if you feel you are broken due to age or wear and tear, you can typically return to running whatever race your heart desires, BUT you have to want it bad enough.
Even if you have failed conservative care, you can often get better under the right guidance. You have just not found it yet. This guide will serve as a way to screen out the correct treatments for you. The most common treatment methods for running injuries are listed below, and they work when your body is asking for it.
- Stretching
- Mobility Exercises
- Soft Tissue Therapy
- Lacrosse Balls
- Rest
- Ice
- Heat
- PRP Injections
- Pain Medication
- Glute Work
- Strength Training
- Core Work
- Chiropractic
- Acupuncture
- Specialist Recommendations
These treatments work sometimes, but not all of the time. When they don’t work, this is where it tends to get frustrating reaping thoughts of:
I’ve tried everything.
Maybe I need surgery.
I think I’m too old to run.
These are all very common and valid thoughts. This is where this guide steps in. You may feel like you’ve tried everything, but you probably haven’t. This guide will walk you through simple analogies and applications that work for my patients who have also “tried everything.” You won’t find these interventions in most therapy, chiropractor, or medical facilities. It’s a collection of unique tools that are extremely useful when applied to the right problem, by the right person.
All of these treatments work when they are the CORRECT suggestion for YOUR REASON for groin/ hip flexor issues. When they are the INCORRECT solution, they will not work.
As you know, groin pain and hip flexor discomfort can limit the enjoyment you have running. It gets old; I’ve been there! However, these ordinarily are simple to address if we get “reduce the driver of the problem.”
The driver of the problem is the compensated motion or a sensitive structure. The sensitive structure can be a joint, muscle, tendon, nerve, or ligament. This sensitive structure, many times, creates movement compensations that remain even well after the structure heals.
A prime example is limping three weeks after you step on a rock. A limp for a week is normal, but three weeks afterward is not. A step-by-step process of the “reducing the driver” is covered in this guide.
Sadly, amongst runners and clinicians alike, there seems to be a lot of confusion about how to recover from on-going groin pain. Online runner’s forums are packed full of stories of failed treatments. Many of these people have failure stories from months of formal rehab, while others express their lack of progress using self-guided procedures.
While I can jump say, “I told you so,” to the self-treaters, it seems equal amounts of people have failure professional care. What’s going on?! It looks like an epidemic is upon us!
Other athletes, such as ballet dancers, baseball players, Crossfitters, powerlifters, soccer players, and football players, can have it as well. Shoot even non-athletes can develop it. Many people will go through months of unproductive treatment with minimal or no change.
Why?
It is a challenging area for even some great healthcare professionals to give guidance. Many different types of musculoskeletal-related groin pain can be reduced similarly, with a slightly different starting point. I’ll cover this at the end of the write-up.
Groin and hip flexor pain, for various reasons, frequently respond well to the type of interventions I’ll lay out in this guide. Everyone has a slightly different reason for their UNIQUE groin discomfort. For this reason, people can manifest somewhat different structures of sensitivity.
If you have been told you suffer from any of the following conditions, yet have never had an MRI to confirm a diagnosis, this guide will be an excellent fit for you.
- Hip Flexor Syndrome
- Tight Psoas Muscle
- Tight Adductor
- Adductor Strain
- Scar tissue or adhesions
- Poor Hip Mobility
- SI (sacroiliac joint) Hyper or Hypomobility
- Lumbar Disc Herniations
- Pinched Lumbar Nerves
- “You’re out of alignment.”
- Subluxations
- Old Age Arthritis
- Psoas Syndrome
If there were damaged muscles or hip structures, an advanced image like an MRI or Ultrasound would find it. If they are negative or normal for your age, then it is a rehab case. Simple.
People who have images confirming a diagnosis of one of the following would not be a good fit for this type of approach:
- Advanced Hip Labral Tears
- High-Grade Spondylolisthesis
- Spinal Fractures
- Malalignment, Dislocation or Sprain Due To Recent Impact or Trauma
Note I said “CONFIRMED WITH IMAGING,” as many people are misdiagnosed/ labeled with these conditions very often due to non-responsiveness to conservative treatment. Not all conventional treatment is considered equal. Some rehab programs are absolute junk, while others are stellar.
Having local hip painful clicking, popping and catching, would also be a bad fit for this guide.
For the remainder of this guide, I’ll be mentioning the words “groin pain” to encompass all of the qualifying situations above. Groin pain could be due to one of the above. In that situation, this guide is perfect!
In my clinical experience, most runners can reduce their issues over 7-10 days if I guide them well. And no, we are not talking about any “quick fixes.” Getting to the driver can happen quickly as well.
Using the first-aid approach, all of your core work, glute work, and stretching will start to work. Without specific first-aid, most corrective exercise tends to work for a few hours, and then the issue returns. When using first-aid, with corrective exercise, many times, the discomfort will decrease within a matter of weeks.
Movement first-aid is a simple concept that I’ll cover in detail later in this guide (Bucket 1 in PS section). For 7-10 days, we “lather, rinse and repeat.” Nothing fancy.
- Don’t pick your scab (painful motions)
- Find positions of comfort every waking hour (no matter what that position maybe)
- If discomfort builds up, put out the first immediately with first-aid
- Be in control of your pain at all times
The first-aid period is odd to people because it is so simple. Yet, it is the missing part of most people’s recovery process.
How can someone establish the correct first-aid for their problem?
Typically this requires an examination and questioning of groin triggering activities. Yet when guessing first-aid, you should take this word of caution. One person’s first aid can be another person’s poison. Through testing is the only way to tell for sure.
How long should it take to feel better?
Not long at all. With the right intervention, most people feel much better within a few weeks. The part that takes the longest is the Strength & Conditioning adaptation that follows our Buckets 1 and 2 interventions (described in the PS section to come).
This guide is a standard template that is a “general guess” based upon my 10+ years of clinical experience. These exercises work well for many runners, yet in some situations can make others worse. In my examination process, BOTH RESULTS (good and bad) help me guide my clients towards recovery. Data is helpful information to your guide, painful or not. You should always seek direct one-on-one guidance if you are serious about getting better. If I can not be that person for you, within this guide, I have some references who may be within your city.
You can only apply a solution to a problem if you know what the problem is.
A standard hip flexor or adductor program will work if the hip flexor or adductor muscles are the “driver of the problem.” Many times it isn’t, even though these muscles hurt. The location of pain does not indicate damage to the local structures.
If the femoral nerve, genitofemoral nerve (femoral or genital branches), low back, or lumbar nerve roots are the drivers of the problem, they will require a different solution.
In this guide, I’ve married the programs together to have the best “general approach” to a specific problem. By the way, the same can happen with different parts of the hip and leg. It’s called referred pain!
You have to stop the driver of the bus to stop the bus. If you don’t the bus will continue moving along.
In this guide, I will take you through some powerful exercises I use, within most of my patient’s first week of care. Using these exercises, I expect improvements ranging from 30-75% within 7-10 days. If these results don’t occur, then I typically reexamine the person because I could have missed critical information.
Note: One crucial consideration in stubborn groin cases is that most pes anserinus cases are misdiagnosed. Usually, they are referred symptoms from L1-L2 spinal nerve irritation, which tracks directly over the region of interest.
If you don’t believe me, Google “genital and femoral branches of the genitofemoral nerve.” Misdiagnosis and application of the wrong program is the most common reason for chronic groin pain in my clinic. Misdiagnosis occurs more than 50% of the time. And no, most of the time, you do not need x-rays, MRIs, or elaborate testing to know for sure.
Don’t believe me? Ask Dr. Google.
Misdiagnosis and/or application of the wrong program is the most common reason for groin pain in my clinic. Misdiagnosis occurs more than 75% of the time, and no, most of the time, you do not need x-rays, MRIs, or elaborate testing to know for sure. And yes, these nerve-based groin pain will in a nearly exact presentation as when you Googled “Hip Flexor Syndrome,” or “Hip Impingement.”
Special Testing
Special tests (electrodiagnostic, MRIs, ultrasound, and more) are requested commonly from patients to “see the problem,” yet are not required to start treatment. Minor nerve compression will not be seen in these images anyways. Most insurances will not cover the cost of an advanced image unless the person has failed to respond to 6 weeks of one-on-one clinician directed conservative care.
Specialized testing is required in situations where someone is experiencing any of the following issues, in addition to their pain:
- Changes in urinary stream
- Having trouble buttoning up shirts, tying their shoes, dropping objects, frequent typos on texting
- Unrelenting headaches
- Change of vision or hearing
- Difficulty with breathing or shortness of breath
- Weakness of a hand or arm
- Frequency or urgency of urination
- Changes in bowel function
- Numbness in the shape of a saddle between their thighs
- Recent inability to use their foot (tripping on rugs and objects)
- Recent unwanted weight loss
- Fever of unknown origin
- Night sweats
- Increased pain at night time
- History of cancer
- Progressively getting worse at a quick rate and inability to find a single position where their problem reduces
These are just a few of the red flag questions your healthcare provider should be asking about when you report for a full examination. Here’s the rest of the list.
I have everyone read about “red flags” so they are fully informed, even though the prevalence of having a serious problem is under 3% according to some resources.
Pain Triggers & Symptoms
Activities that may trigger pain can vary based upon severity. Most people are not textbook:
- Pain with hip flexion movement such as kicking, running, hurdling, jumping, or sprinting
- Pain when walking upstairs
- Pain when running hills
- Pain when taking your foot off of the gas pedal
- Prolonged Walking
- Twisting/ Turning
- Groin pain While Sitting On Toilets
- Deep Squatting
- Bending forward to put on shoes
- Lifting objects
- Rolling over in bed
- Getting in and out of cars, as the leg lifts
- Yoga
- Riding your road bike (especially on a trainer)
- Golfing
Symptoms can include:
- Difficulty in weight-bearing on the involved leg
- Increased after prolonged sitting
- Gradual onset
- Sharp pain in the crease of the hip, with or without trauma
- A “cramping or clenching” sensation in the upper thigh
- Constant or intermittent soreness of the upper leg
- Loss of strength during walking
- Loss of hip strength
- Muscle spasms within the groin or front of the upper thigh, not past the knee
- Limping when walking
- Reduction of hip mobility
- Sitting increases symptoms
- Improvements in symptoms with allowing hip to flare outward
- Achy feeling into the inner thigh, sometimes to inner knee
- Numbness into portions of the thigh, shin or inner arch of the foot
Just a note, numbness almost ALWAYS means nerve involvement.
Sometimes it doesn’t hurt during activity at all. It tends to become more noticeable after the movement has stopped. Some may say after their hip warms up that it no longer hurts, but after it cools down, it becomes painful again.
Identification of the Driver
What’s driving your groin pain?
Many people attempt to figure this out themselves; therein lies the problem.
There are professionals in this world who can quickly figure out what’s driving the bus, but their assistance costs money. Not a lot of money, but they do cost money. Problem solvers like this can range in cost between $100 – $500 per session.
My exam costs range from $140-$275 for an exam and treatment. Not too bad considering I spend between 30-60 minutes troubleshooting with you. The cool thing is you walk out feeling in control of your problem, and you’ll have a game plan. That means no more guessing about what to do, and you’ll get better faster. That is the value of seeing a problem solver in person.
This section will sound like a tangent to the reason why you bought this guide, but I can promise you it’s not.
Hear me out, and I’ll return to the groin topic in a few moments.
Since the invention of health insurance, many people feel their insurance should cover their doctor visits, therapy, and treatment for their aches and pains. Over recent years, this has become less and less true.
Only some treatments and testing may be covered, not all. Sadly, the best care usually is not covered under your plan, and some of the best doctors aren’t either.
Yes, your medical insurance may cover SOME types of treatments. Still, as I tell most people if any treatment is going to work for you, it will within a few weeks, as I mentioned above. You should experience a significant change within a few weeks in MOST situations.
If that’s not the case, it’s the wrong solution to your problem. Simple.
Finding the correct solution may cost you money. Finding a therapist, athletic trainer, or sports chiropractor who is willing to invest time in you is the first step.
Medical doctors or “experts” (aka specialists) can assist in this process. Still, they frequently do not always have the skills of using movement and rehab as a solution. Much of the time, medication and surgical interventions are where they excel. Yet, these types of treatment interventions are not helpful in many people’s situations.
A skilled movement guide can help you identify what the source of your pain is before suggesting insurance covered, a “one size fits all” solution.
Clinics offering a “one size fits all” type of solution, is probably covered by health insurance. Still, I would curb your dreams of a speedy recovery. In these “mills,” everyone is treated the same, even though they have a UNIQUE reason for their problem.
Sadly, many people have received treatment in clinics like these. Their lack of recovery left them frustrated, feeling like they’ve tried everything, and hesitant to try anything else.
How will you know if you’ve experienced a clinic like this?
When these clinics recommend rehab exercises, the funny thing is you’d have done them all before. Recommendations like glute clamshells, hip stretches, foam rolling, and exercises using bright bands are their “go-to” exercises. Nothing you haven’t already tried. All low-reward/low-risk rehab interventions.
You’ll feel out of place and surrounded by people who don’t push their bodies physically.
You’ll feel walking out feeling better, but the pain will return within two days or less. Most of the time, the relief you experience is not long-lasting.
They often accept HMO and EPO insurances. Nothing against them for accepting HMO and EPO insurances, but by the numbers, it’s hard to offer comprehensive care when you get paid so little. It’s just not logical. They would go out of business if they offered more.
These insurances don’t pay for much more than the basics. The basics are excellent when they work. These clinics receive minimal payment from your health insurance but keep the business open by seeing a more significant number of patients, for a shorter amount of time. Hence, the term “a mill.”
That’s the simple business of healthcare insurance-based clinics. They make more money when they see you more often.
Months of treatment = more money for clinic owners.
But wait, isn’t your goal is to see them less often?
Similar to dating someone who wanted kids, but you don’t. Miss matched goals are challenging.
What treatments are covered by insurance?
Treatments covered can vary. The least effective services are usually the ones that are included, such as quick adjustments, simple rehab exercises, injections, surgeries, heat, ice, massage, and stretching. Not to say these done work, but they don’t ALWAYS work. If you’ve tried them for two to three weeks, you would know if they were going to work, period.
If they don’t work for you, do you care if your insurance covers them? I wouldn’t. I’m able to get free cheap drinks at the local pub during happy hour daily, but that doesn’t mean it is good for me.
Correct me if I’m wrong, but you want to get better, right?
You want the best care for YOUR UNIQUE problem, right?
Do you see the struggle?
Many of these “in-network” treatments are not productive in most stubborn groin cases and rarely get active people to be active again. These are the kind of places that tell you to “rest it” or “stop running.”
Frustrating, I know.
I know it sounds like I am on a tangent, but I promise there is a reason! 🙂
To improve, you must figure out your appropriate first-aid (Bucket 1).
If a spinal component is the driver, you need to find your spinal direction of benefit/preference. The direction of benefit is the physical direction that reduces symptoms within minutes. It usually is a low back round or an arch, but a lean towards or away occurs in rare situations.
The opposing direction is called the direction of detriment (if a spinal component is driving the bus). I included a video on this topic to give you a better idea on this vital topic.
When the spine, or spinal nerve roots, are correlating factors, we need to address them first. If they are not part of the puzzle, most of the time, people skip the “first-aid” section of the process described below and simply begin the process after the spinal first-aid steps.
Non-Spinal Drivers
What if there is not a spinal driver?
Great question, you’re very astute.
Sometimes the hip itself requires local first-aid that generically can come in the form of taking pressure off of the provocative joint position. I’ve included a video of this specific first-aid.
You’ll know it is the correct first-aid when it works. I’ve laid out a few first-aid options in order of the highest success rate in the section of the appropriate first-aid activities. You’ll know what one is correct for your condition because there will be a 30% reduction of symptoms immediately after completion.
Similar to spinal-based first-aid, the local hip first-aid is performed with high frequency, daily. The daily routine should occur for 5-10 days (significant problems may require longer). Afterward, the same rehab progression occurs as laid out in this guide.
It sounds a little confusing, I know, but it’s all about applying the appropriate solution to YOUR UNIQUE PROBLEM.
If you visit someone like myself, it will take us about an hour to find your direction of benefit and/or local hip first-aid requirement. With specific instructions, most people get better with leaps and bounds. You will be running again within a few weeks, and groin pain will decrease significantly within less than a week.
Check out this testimonial from a person who used this exact video guide and experienced success. They tried all of the traditional stuff with minimal success.
I’ve included a link to our Facebook page so you can see some real patient testimonials. This example did not come from a “one size fits all” programming. If you find success using this guide, please post your story there.
If you go to a clinician who only does the “basics,” you may get better, but it may take months or longer.
If you do it yourself, it may take longer, unless you are paying attention to details.
You haven’t been through the proper schooling to diagnosis and rehab people.
You haven’t seen thousands of people with this similar these to know what program to apply.
You are also too close to the problem to see a bird’s eye view.
I call this the “big boy/ girl conversation.” People who do their tax return should expect to have it take longer and have more errors. It’s the same with healthcare. Be educated and pay attention to how your body is responding, BUT get a professional guide if you want to find your way to a buried treasure.
Allow me to sum all of this up. You have three options for recovery:
- Go to someone experienced and expect a quick reduction in pain and be running again in a matter of weeks.
- Go to someone “within your in-network” and expect pain reduction to take months with no promise of returning to running.
- Do it yourself and fumble around a bit, have minor success and get frustrated before you see a professional.
“Self Treaters” tend to fumble around a bit, which is okay. You are not failing. Just know it comes with the territory.
This guide meets you where you’re at, Option #3. The information in this guide works for me with a rough 90% subjective success rate at our clinic. It’s not the exercises that work; it’s how the exercises are applied that work. Precise exercise prescription and coaching is what you pay for with an experienced professional guiding you.
Our “big boy/girl” conversation is this; go see a professional. They are worth the money and time.
Life is too short to be in pain.
Here are some directories that may help you find one.
Rehab to Performance
ACBSP Sports Chiropractors
Clinical Athlete
Not all of these clinicians practice the same, so buyer beware. I’m only on one of these lists, but I have taken some of the same schooling as these people.
Performance Place® Sports Care Experts
- Huntington Beach, CA – Sebastian Gonzales DC (myself)
- Huntington Beach, CA – Dawne Costantino DC (interned/ trained under me directly)
Google search the experts below I love and trust (and get nothing for referring to):
Non-Affiliated Experts
- Huntington Beach, CA – Sara Van Dyke DC (interned/ trained under me directly)
- Del Mar, CA – Ben Ramos DC
- Portland, OR – Phillip Snell DC
- Eastton, NJ – Jeremy Dinkin DC (interned/ trained under me directly)
- Reno, NV – Kyle Hemsley (interned/ trained under me directly)
- Boulder, CO – Nathan Nutter (interned/ trained under me directly)
- Dallas, TX – Cody Dimak DC (at Parker University)
- Santa Monica, CA – Justin Dean (DC not MD)
- Scottsdale, AZ – Jeff Beran PT
- Pittsburgh, PA – Donald Murphy DC
- Vista, CA – Donald Mull & Ben DeLuca DC
- San Diego (Downtown), CA – Justin Wilcox DC
- Tampa, FL – Grant Elliot, DC
- Denver, CO – David Newton DC
- Troy, MO – Brett Winchester DC
- Seattle, WA – Michael Li DC
- Corte Madera, CA – Pali Cooper DC
Back To The Guide
Now back to the guide.
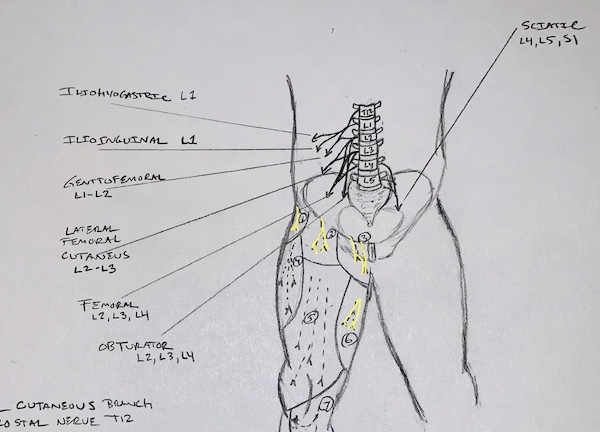
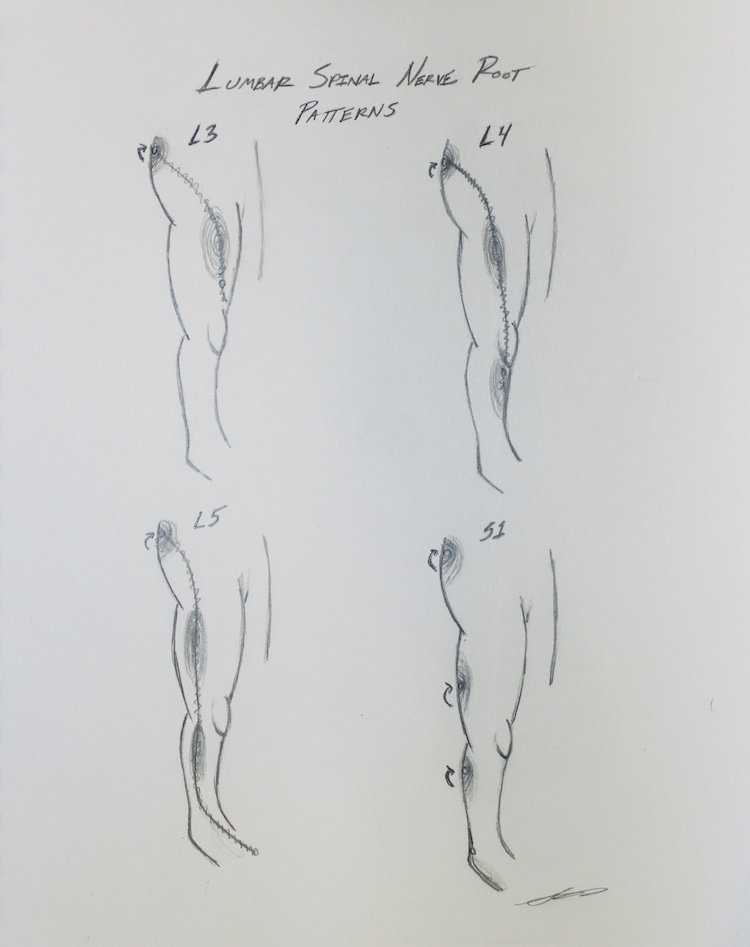
Here’s an image I drew with referral patterns of some of the common spinal nerve root issues that endurance athletes will see.
Look at L2 – 4 referral patterns in the image to follow.
First, notice the path of nerves #2 and #3, the genitofemoral nerve, and ilioinguinal nerve, respectively. They pass directly over the location of most people’s groin pain.
Next, notice the path of nerves #5 and #6 (anterior femoral cutaneous nerve and obturator nerve). They may account for the upper, front, and inner thigh pain the is very common in people with self-diagnosed hip flexor strain and hip impingement.
Now notice the path of nerve #7. See how this nerve (saphenous nerve) tracks right over areas of Tarsal Tunnel Syndrome, Posterior Shin Splints, Posterior Tibial Tendon Dysfunction, Inner Heel Pain, Medial Arch Pain, and Hallux Limitus.
Many of the array of symptoms associated with groin pain, especially down the thigh and leg, can be accounted for if we address the issue at the spinal driver.
They cover the buttocks, IT Band area, and shin. Light pressure on these nerves can mimic IT Band Syndrome, Piriformis, Calf Cramps, Tibialis Anterior Spasms, Plantar Fasciitis, Achilles Tendonitis, Peroneal Tendonitis, ankle impingement, and so much more.
As noted above, they create pseudo-syndromes that don’t respond to traditional therapy because the spinal nerve is the driver, not a muscle.
Many people say, “I don’t have back pain; could this still be my driver?”
Great question. No, you don’t need to have back pain to have nerve pressure creating a referred pseudo-syndrome. Commonly people feel some back tightness that is “not uncommon for them.” Some feel pressure in their SI joint too.
Because unaddressed referred pain is so prevalent, I’ve included a few videos that will address spinal-based concerns. The videos are all movement-based corrections I use with my patients that can quickly reduce spinal-based groin pain.
On the flip side, some runners have an “actual” groin muscle issues, as I mentioned before. The great thing about the method of rehab I layout is that it addresses both spinal and “actual” muscle-based issues. The only difference is your starting point.
If the spine is the driver, we start at the spine.
If the spine is not the driver, we scrap the spinal first-aid (Bucket 1) and keep moving in the guide.
Why is the guide as long as it is?
This guide used to be three pages long with a list of videos, but readers had questions and concerns. I expanded this document to address those common questions. I didn’t want it to be overwhelming on purpose, so I kept it as short as possible.
This guide is merely a “gateway” into using corrective exercises to assist in the reduction of groin in distance athletes. If you’re not a runner, never fear; it works for non-runners as well.
As you’ll see, I did not produce all of the videos. Some of the videos are going to say they assist with other conditions such as hamstring strains, foot pain, back issues, knee issues, and more, but don’t get distracted. These videos have been hand-selected by me because of the WAY the corrective exercise is taught. Corrective exercises help with more than one issue.
Can you find some of them for free?
Yes, but you probably never would have found them on Youtube, to be honest. I’ve saved you the massive headache most people get when searching for answers. You’re paying me to be your guide and save you time.
I’ll complete my own video course soon, but for now, this is what I can quickly create for those of you who’ve directly asked for a guide.
When used correctly, exercise can reduce symptoms without the use of manual therapy. At this moment in your recovery, movement can be medicine, but it can also be a poison. Proper selection, dosage, and frequency are critical in a timely recovery. Amazing results can happen within a matter of weeks.
The choices you make and the daily habits you create moving forward will give you information to help recovery. I hope, at the very least, you’ll see how controllable pain can be. I hope you’ll find that you’re in control more than you knew. You are a large part of your recovery process; you hold all of the information needed to make yourself feel better! You just need to organize that information better and know how to apply it.
Pay attention and take notes!
In my clinic, we predict a “positive and noticeable” change of symptoms within MINUTES of applying the right intervention. Granted, I’ve been doing this for years, yet these types of results are possible by using movement as medicine.
What should you feel during the exercises, with first-aid being the exception?
Exercises from Bucket 2 and 3 will create an “effort burn” in the muscles around/deep to/on the glutes, hips, quads, hamstrings, core, and foot regions. Stabby sensations or discomfort in other areas are possible, but not desirable. Pinpoint areas indicate poor exercise selection or poor performance of the exercise. If this occurs, I’d restart the exercise, coach them into the desired effects. I ask them to take note of what they feel.
If my patients feel pain or panic, I tell them to pause, take a breath, and we regress the exercise. Most exercises and movements have a regression. The regression is easy to find for most coaches, but self-treaters tend to struggle with this. In Bucket 2 and 3, you may experience this. My suggestion is to research regressions online. I was not able to place all of the regression in this guide. The guide would have been massive if I did!
If the regression does not help, I deem that exercise as not being appropriate for that person in that PHASE of their recovery. I tend to add it back in it’s regressed form within a week or so when they are ready.
Also, understanding Bucket 2 “corrective exercise” is an intermediate step that is critical in recovery. Light to moderate resistance training is the next step Bucket 3, but will not be covered in great detail in this guide.
Resistance training builds the body’s ability to move with the foot on-ground activities, like running, lifting, and sport. I may cover this in guides offered soon, but the most important steps at this point are within this guide.
Using exercises as medication works best using an audit process.
- Keep it simple
- Test how you move
- Do an exercise
- Then re-test
If you feel better, then use that exercise gradually over the month until your body has adapted. Over time your body will adapt to constant exposure to the tasks. Weight, duration, and repetitions should change over a few months.
When most people get to this point, they are feeling much better and asking for more Strength and Conditioning (Bucket 3) recommendations. One day soon, I’ll get my act together and make a template for you guys. Email me to nudge me along.
Lastly, I should address any concerns you may have about gait retraining. Sure, it can be helpful, but that comes after Bucket 2 and 3. Isometric (non-movement) single-leg stance work is addressed, which combats hip drop, valgus collapse, and lumbar extension. If you’re a non-runner, then don’t worry about gait.
Even the “falling forward” ways of running, require the ability to hold a plank as a precursor. Many running faults can be identified in running gait analysis. Still, the ability to hold a position isometrically precedes the ability to do it with movement and under cardiovascular strain.
If running triggers your problem, then gait should be addressed, but it is not the best to do until you’ve completed my program suggestions. You’ll be looking back into gait training again before you know it, but place it on the backburner for now.
If lifting weights provokes your problem, then you’re probably losing tension in your lifting. Appropriate tension is critical when resistance training and entering Bucket 3. I have a whole podcast on this, here.
I believe the use of a running and lifting coach is required to take you further in either forum. Yet pain corruptions motion and creates compensations. Reducing pain before coaching movement assists the coach in getting the desired outcome.
This guide is not a quick fix. It cuts off the root of the problem. Anyone who tells you about a quick fix is full of crap. There are no quick fixes when returning someone to pre-injury status. There are quick wins and rapid reductions of pain, but that is the start of the journey, not the end.
Don’t be cheap. It’s worth finding an exact direction.
Enjoy!
Sebastian
UPDATE FEB 2020
Periodically I update the guide with snaswer to common questions, via an audio file. Without overstepping my professional boundaries, this is the most productive way to make this information avalible.
Topics:
- First Aids
- Symptoms changing (peripheralization)
- Giving feedback
Categorizing the Videos (Bucket 1)
One last thing, as a way to categorize importance on the following exercises, I typically place them into the four buckets.
Bucket 1: First-Aid/Safety Nets
Bucket 2: Corrective Exercises
Bucket 3: Therapeutic Resistance Training
Bucket 4: Returning to PLAYfulness
You are wondering what bucket to start with?
I have no idea because I haven’t met you. Currently, I do not offer virtual consultations, so you won’t be able to ask me directly. To have my exact answer, you’d have to see me in person. All I can say at this point is, it would be wise to start in Bucket 1 and move through to Bucket 4 in that order.
To be honest, a surprising amount of people I see don’t need to spend more than a day in Bucket 1. They spend their first week in Bucket 2 and quickly move on to Bucket 3 while keeping tension through the exercises. They get better soon with an accelerated plan because they use the tools well and perform the dosage required to feel better. Bucket 1 is needed to establish a safety net, a way to decrease pain even if a trail of Bucket 2 and 3 flare it up.
It is wise to start in Bucket 1 to establish control.
BUCKET 1:
Bucket 1 includes movements and positions that make us feel better quickly, yet don’t strengthen or support anything. First-aid is a metaphorical band-aid. Band-aids do nothing to prepare the body for the reintroduction of activity further.
Within the video section, possible first-aid options are listed in the first section. Typically, used for five days with high frequency, first-aid should then be removed in place of spending time in other buckets.
When Bucket 1 items work but yield no lasting relief, I tend to look into that person’s daily habits. Are they “ripping their scab off” with another activity during the day, which prolongs the first-aid time frame. Identifying and modifying the “scab ripping activities” typically address this issue. These activities can vary greatly, yet are easy to identify.
Activities that create pain during or afterward should be noted and modified. For some people, there are as few as one sab picking activity; with others, they can number greatly. To not feel mentally overwhelmed, modify the easiest ones first, and see what happens.
When pain remains, you should stay in Bucket 1 until you’ve found your appropriate first-aid. Yet, it would be wise to see someone professionally.
My girlfriend found trouble with her lower back first-aid as well, so I opted to have her examined by a colleague. He discovered that she was beginning to show signs of fearfulness of movement, which is terrible for long-term success.
At that time, he refined her first-aid, and she got better with leaps and bounds. Within two days, she was able to wash her own feet, put on her shoes, and jog without pain. Dialing in first-aid is the greatest recovery secret I can give you, but sometimes professional help is required.
Elimination “scab ripping activities” should be complimentary in some stubborn cases. In my office, all we cover on Day 1 is first-aid and scab picking, because it is that crucial for their recovery. They can not move past this point until we have confirmed and used their first-aid/ safety net.
I’ve highlighted the two most common first-aid activities in the video section. First-aid exercises typically have a “minimum required dosage and frequency.”
Dose means “how many times per session.”
Frequency means “how many sessions per day.”
How many days should first-aid be performed?
The exact answer is beyond the scope of this guide.
Just know it ranges from 5-10 days (often). Things tend to be on the mend sooner, even within a few days.
First-aid can be challenging for many people to understand. It’s a frustrating time in their recovery. Many people think this first-aid should be more effortful, and they tend to hinder their progress. It’s human nature to think more is better. More is not better in this case. I’ve sent these exact first-aid videos for friends to try virtually. More than 1/2 of the time, they need to be shown in person to simply not deviate from the instructions in the videos.
For this reason, it’s common to see people have a much higher success rate when being guided in-person, rather than on videos.
I know, I know. You have this video guide. I’m not saying it can’t be successful, but the probability drops. I know I sound like a broken record but, if you want to get serious about recovery, you need to go to someone in person.
True story. I’ve sent these exact two first-aid videos to friends as a recommendation. Over 50% of the time, they end up coming to see me in person, frustrated about the video exercise not working for them.
“I tried the exercises you sent me, and they don’t work,” they say.
Low and behold, after I helped them through the activity, the exercise works with flying colors. They run around the parking lot, testing out their pain-free body blown away that they have been “fix.” These few exercises are how I reduce many conditions of the lower back, hip, knee, and ankle.
Some of the treatment methods you have heard so much of will work if it is correct for your problem. Deep tissue work (of various three-letter acronyms), taping, adjustment, cupping, acupuncture, massage, core work, and surgery, all work when they are correct for YOUR UNIQUE problem. I have many stories of clients who have felt better using one of these treatments.
Still, I have many more people who come to me because these treatments failed them. When the solution works, it works! When it is not the right fit, it will not work.
So why can’t some people figure out how to use these exercises on their own?
This lack of correct application leads me to the Common Mistakes section. Very often, people make these critical mistakes:
Bucket 1 Mistake 1: They forget the exercises are a part of a “dosage effect.”
One day of exercise does not fix anything; it is the dosage effect that does.
Some people get so caught up in the excitement of feeling better that they forget the “dosage and frequency effect.”
One rep will not make you better, nor worse. The higher the dose, the better, or worse, things get. Yes, I said worse. Things can get worse. It’s not often that it happens, but this is why my job exists. To test what is appropriate for each person for their problem. There is no “one size fits all.”
With the press up exercise (video 1), we establish if this is the correct first-aid via an examination that partly entails repeated reps of the first-aid as the first “dose.” A successful first dose shows that we are on the right track, but we have a ways to go.
If it looks fruitful, typically, we ask clients to perform 10 reps (of tolerable height) every “waking hour.” When that sounds like too much thinking throughout the day, I ask them to do 40 reps in the morning and before they go to bed, and scatter another 120 reps throughout the day.
The goal is to get around 150 reps a day for five days spread throughout the day. Not 150 in one sitting. I tend to pull this first-aid away within 10 days to mitigate other problems later when the “medication becomes the poison.” You can have too much of a good thing.
For the opener exercises (video 2), should be very comfortable, and this position should be attained around 5-15 minutes a day. Just like the backbend exercise, the goal is to spread things out throughout the day, rather than one big shot once a day.
If I included a third or fourth video, those would be your last remaining options if the first two don’t work.
I compare the first dose on Day 1, similar to a medical doctor sending you out his door with the first pill of antibiotic treatment. As you leave, they also instruct you to go to the pharmacy and pick up your next four days’ worth of pills.
Same idea.
These will become painful if done too long. Hence I say “first-aid” of 5-10 days. At some point, these beneficial “medications” will become a poison. The overuse of first-aid is a common mistake.
Bucket 1 Mistake 2: They forget that the backbend exercises are often not comfortable within the first 10 reps. This is not an issue with some of the other first-aids.
My girlfriend is an excellent example of someone overusing first-aid. It was very uncomfortable to do the press-ups when she first hurt her lower back disc. (Yes, this exercise is helpful for more than just one thing).
She struggled through the first 5 reps, yet after 10 reps, she was able to reduce her back pain significantly. In 1 minute (10 reps), she went from literally being in tears to having a casual conversation. But she DID NOT want to go past the second rep. It was uncomfortable.
Do you follow? Remember above, when I discussed the “direction of benefit.” If not, go back and watch the video.
She had next to her as a guide, so I could assess if these exercises were correct for her. Naturally, her experience was more extreme since it was a very fresh injury.
Bucket 1 Mistake 3: They think doing all of their reps at one time is acceptable.
It’s not. It should be spread throughout the day.
Bucket 1 Mistake 4: They jump to more other buckets before getting success in Bucket 1.
Don’t. Simple.
Bucket 1 Mistake 5: They tell me “why they didn’t have time to do the exercises.”
I care for my friends, but as a coach, I don’t see any reason I should allow them to make excuses. I give them a “big boy/ girl” talk and tell them to do it again.
Bucket 1 Mistake 6: They get distracted by the “what else should I be doing?”
I can’t say this in this guide because I have not examined YOU. With people I work with in-person, I can say with high certainty that most of the treatments they’ve been trying have no place within the first week of their recovery.
Ice, heat, stretching, yoga, massage, injection, herbs, and any of the new fancy things they may have read about on Dr. Google are all not needed UNLESS I told them to add it. I’m not saying these things don’t provide some level of help, BUT they may not be useful AT THIS POINT IN TIME, for this person, with this problem.
People tend to get married to the idea of still doing what they have been doing and end up adding those old exercises to what I gave them. I get it, but if you want my honest answer, you’re wasting your time, and your recovery may suffer.
More stuff is just more stuff. More is not always better. Besides, everything you’ve tried has not worked yet. Why keep doing it?
I tell them to “trust me and just do the things that I suggested. I’ll let you know when it’s the right time to add in what you have been doing.”
And this leads us to Bucket 2.
Categorizing the Videos (Bucket 2)
Bucket 2 items are corrective exercises. You’ve seen them on social media as the silly exercises you see movement doctors and therapists share. They tend to be floor exercises that require balls and bands. If you search the web about “mobility” or “flexibility,” you’ll be presented with thousands of options. There are infinite amounts of them.
They’re useful because they assist in retraining an area that has gotten weaker or no longer wanting to support the area that is generating symptoms. But just like medications, if you pick the wrong ones, you won’t get better. We choose them with a purpose.
Corrective exercises are stepping stones and should be used as a warm-up to resistance training, or sport, as soon as possible. Typically around two weeks or less, but in some cases, it takes longer if there are complications with results. I wish I could say everyone will have an immediate positive effect from corrective exercise, but it would be a lie. A Birddog exercise could make one person better and another person worse. Why is that? It’s how the task is performed.
The application of corrective exercise is not a one-size fit’s all solution. There are small stepping stones within an exercise prescription. You can always make it more or less challenging to seek a pain-free experience. No corrective exercise should aggravate the problem. It will be effortful, but not aggravating to the primary complaint.
If it aggravates, I simply regress the exercise once and re-test how it feels. If it still provokes the issue, then I remove it altogether and then attempt to add the regressed version in a week or so as a test. I’m not married to any exercise in rehab.
My last comment about Buckets 1 and 2 is that people use them too long. I’ve met people who are still doing the same exercises (that make them “feel better”) for 5+ years. Bucket 2 tasks should be progressed within less than two weeks and removed within six weeks. Bucket 2 is a stepping stone to real life, which we encounter in Bucket 3.
Bucket 2 Mistake 1: The exercise EFFORT LEVEL is not enough
I remember the first time I performed a therapeutic corrective exercise with high effort. Prior I had been performing glute exercises light enough where I felt safe. I felt confident I was not going to hurt myself. It was easy enough where I would still hold a calm conversation while I was performing them.
This time was very different. Holding a conversation during the application was not an option. Breathing was even challenging! The corrective exercise expert coached me into so much effort that I thought I was going to walk out feeling worse. I wondered if the exercise and the high effort level were safe for me.
We were performing a targeted Glute Maximus exercise we were using to increase the muscular tone through high effort. The theory of why we did with such high effort is called the Attractor State Principle for the nerds out there. I won’t cover that here, but you can hear an interview I had with Guido Van Ryssegem about it on my podcast.
My coach assured me it was safe and that I would feel better immediately after doing it. I was asked to exert 70-80% perceived effort. I trusted him.
After performing the exercise, I stood up, and I was able to squat down with no pain. I could touch my toes and even round my lower back. All movements that created 4/10 pain moments prior.
People ask me all of the time, “what do you mean by 70-80% perceived effort?”
Me: What is 100% perceived effort for you?
Them: Failure
Me: Great, do what you feel is 70-80% of that while keeping the cardinal rules in effect.
- This exercise should feel EFFORTFUL in the area intended, not painful in your area of concern.
- Take small breaks if you need it, but wait too long (under 5 seconds break for most)
- You should feel large areas of muscles working, not pin-point.
- If you have a muscle cramp that grabs quickly, not slowly, take a break, change the range of motion used, or add more tension that biases other larger muscles.
- You’ll know you go over 50% effort when you make funny faces.
- Don’t hold your breath.
- DO NOT PUSH THROUGH PAIN IN YOUR AREA OF CONCERN.
The mistake people make is they follow exact numbers of sets and repetitions. That is not important. It is the effort that will make the changes needed. 10 effortful reps will outperform 40 easy reps every time, at least in a therapy setting.
Bucket 2 Mistake 2: Thinking high effort requires high repetitions
Try making a soft fist verse making a hard clenched fist like you were holding a rope that was saving you from falling down a cliff.
Firmness of a fist is an example of tension differences in a fist. High tension is exhausting, and it will make your corrective exercises repetitions go from 20 to 10 quickly. That’s a good thing. Using high tension movements in Bucket 2 is suggested as long as the cardinal rules are obeyed.
High tension cues seem to make unproductive Bucket 2 cases into successes!
Categorizing the Videos (Bucket 3)
Bucket 3 is where things start to stick.
Resistance training can be EXTREMELY therapeutic when appropriately done and programmed according to each person’s unique deficiencies. The following videos scratch the surface of Bucket 3.
Most people continue to see me until they’re able to comfortably perform at least 1 exercise in each resistance training category:
Push, Pull, Carry, Squat, Hinge.
Each exercise category is a MOVEMENT that can be loaded. One misconception is how much load is needed to create a long-term adaptive change.
The short answer is not a ton. Social media bragging tends to make people feel they need to lift a ton of weight, but that’s incorrect. We don’t have to lift massive amounts of weight. We only have to lift enough to be a pain-free challenge.
Think movements, not muscles. As we integrate back into a life not plagued by chronic problems, we need to pattern and train movements, not muscles. The body is one unit that can not be separated. Train it to work as a unit.
Again, I only scratch the surface in this guide because it is a much larger bucket. Bucket 3 activities are something most people should continue to do on a 1-2 times a week basis indefinitely.
Categorizing the Videos (Bucket 4)
Bucket 4 is where life begins.
People tend to stop thinking about their bodies as being “broken and weak.” People stop thinking they are fragile. They begin to live a life where they believe their body is resilient and can overcome most aches and pains with the right plan of attack. They tend to forget they ever had an on-going issue in the first place.
Many people go through their recovery with an end goal of being “pain-free” when they should be thinking about returning to PLAY/ PLAYfulness.
Playful activities are where people thrive. Some examples are: chasing kids, dancing, wrestling, playing in the dirt, and kicking around a ball. Human interactions, smiling, and laughing are common beneficial side effects.
Also, the variation of movement “shakes the rust” off the people who live in Bucket 3. We are breaking the “movement rust” off the Tin Man. We are oiling him.
Play is reactive, unscripted, and how humans are naturally supposed to grease their joints and strengthen their muscles.
Most of us do not have enough exposure to variable motion to have this desired effect. You should be exposed to a wide variety of movements daily to take advantage of the natural therapeutic value. Movement is nature’s 5-star day spa treatment. It reduces muscle spasms, lengthens tight muscles, pumps joints full of fluid, feeds our cartilage nutrients, and much more. It keeps you young in body and soul.
We just don’t do it enough, myself included. We work, drive, sit, eat, and drink when we are socializing. We could be playing instead! Our body craves variable physical activities. Yet, we don’t often have enough people to have a pick-up game of soccer/futbol or freeze tag. It’s more convenient to push ourselves with endurance.
I’m not saying we’d all rather play freeze tag then participate in running races and triathlons, but this is true for some recreational runners and triathletes. Endurance sports are sports. Soccer/futbol is a sport. Motion in the running requires much of the same movements with higher cardiovascular challenge. Soccer/futbol exposes the body to a much wider variety of movements, with less cardiovascular demand.
To reduce an injury, select an enjoyable activity that exposes your body to their other planes of motion, in addition to returning to running.
Many recreational athletes lack strength, so I require at least a light version of Bucket 3 exposure to build strength. Spending too much time in Bucket 3 comes at a price like everything else in life. Bucket 3 teaches you to move like the unoiled Tin Man, which is terrible for play. So in Bucket 4, we are unlocking guarded motion that tends to come along with building strength via resistance training (Bucket 3).
Think about what you’d like to do for your play in Bucket 4. Use this as a goal as you progress through the other buckets.
Now on to the hand-selected videos.
Message me on Instagram @performancehb to let me know your experience
The 9 Videos
Bucket 1:
1: Press-Up First-Aid (Will make 20% of people’s hip/groin worse, but the odds are in favor of testing)
2: Opener First-Aid (Involved side outward, for those who don’t feel better with the first one)
3: 90-90 Breathing First-Aid (Spending 1-2 minutes per breathing session. This can be done in a chair while working if one can’t find a ground position throughout the day.)
Bucket 2:
4: Abdominal Stiffness Warm-up
5: Diagonal Sit with Glute Raise (do both sides)
6: Lateral Band Walks
Bucket 3: This is only a small fraction. The complete series will not be covered in this guide.
7: Farmer Carry
8: Goblet Squats – (short video yes, but great instruction)
9: Single Leg Patterning
If you are interested in more of Bucket 3, I do offer monthly templates for strength training. Simple, sustainable, affordable, and perfect for people to decrease re-injury. As mentioned above, Bucket 3 work is where most people should most of their time.
Email me with the Subject: Hip Strength for more information. Support@p2sportscare.com
Bucket 4:
Not covered in this guide.