
This is Part 1 of the ultimate guide to fixing hand numbness from ulnar nerve compression.
And let me be clear about something:
This is NOT your average “ulnar nerve exercises and stretches” post.
Yes, I’ll cover the most important things to do BEFORE you start applying stretches and exercises to your ulnar nerve.
But things have changed since 2020 and before. Lots of things!
So if you’re looking to improve your ulnar nerve (and hand numbness), you’ll love this updated guide.
Note: Read the disclaimer and always see a doctor first. If you need some help virtually (or in-person) the “Locally World Famous Chiropractors®” at Performance Place Sports Care are ready to work with you!
Warning: Waiting too long can result in nerve damage, which is hard to overcome. If you are serious about getting better come see us in Costa Mesa CA. You can book a session on our header.
What Are The Symptoms?
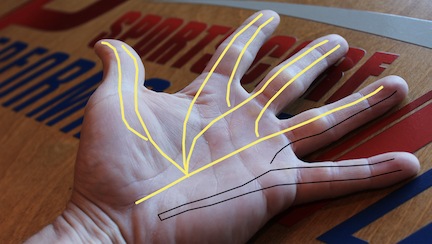
- Do you have numbness, tingling or change if skin sensation down into your ring and pinky finger?
- Is it worse at night or while sitting?
- Is your hand numbness dependent on your position or posture?
- Does your hand numbness get better or “come and go?”
If so, you are not alone. These are symptoms of a possible ulnar nerve entrapment (amongst other possible diagnoses), which is often correctable once you figure out the location of the problem, or where the ulnar nerve is being pinched.
In my experience, for some cases, numbness can be reduced within a matter of minutes, if caught early when numbness comes and goes!
In more advanced cases it takes months.
Typically, the longer you’ve been experiencing symptoms the longer it takes to feel normal again… and in some cases, the changes are very, very long lasting.
I’ve personally had hand numbness, yet unlike many of you, I’ve been fortunate to have a professional education that allowed me to trouble-shoot “what works and what doesn’t work” to resolve my pinched nerve.
I was able to find the location and release it quickly, which is why I don’t have long-term damage. Thank God for that.
AS ALWAYS, PLEASE READ THE DISCLAIMER FOR YOUR OWN HEALTH’S SAKE BEFORE TRYING ANY OF THESE EXERCISES.
The word “treatment” or “therapy” for an ulnar nerve compression is extremely broad, and for that reason, can reap very frustrating and haphazard results. Typically, ulnar nerve issues are not extremely complicated to improve, but knowing the exact location (and cause) of the pressure is what will take your “treatment” from a zero to hero.
I’ll sound like a broken record but DO NOT let your numbness turn into nerve damage. Rapid treatment is suggested for intermittent numbness and hand pain
.
Passive Care vs. Active Care
The two types of treatment are passive care (temporary, quick fix, pain management) and active care (prevents relapse, especially when not trauma-related). Passive care can help modify pain and symptoms like hand numbness, which is excellent for immediate symptom reduction and decompression. Passive care ranges from soft tissue work, taping, and chiropractic adjustments to even surgical decompression. Applying the right treatment at the right location of compression or irritation can yield rapid results. I’ve personally seen people have a 50% reduction of numbness and tingling doing non-surgical treatment within a week, and I’ve also seen some of my patients fail non-surgical care yet get full motor function of the hand back within a few weeks after surgical decompression!
However, relying on passive care (when non-trauma related onset of hand numbness) is only half of the solution. When active care (resolving movement compensations, muscle imbalance, posture, and strength) is ignored, symptoms return sooner and patients get frustrated. Active care helps resolve how we got into this situation (again, non-trauma).
This article will focus on the passive, or “quick-fix,” exercises, stretches, and more that we use at Performance Place Sports Care with great success!
For the active care part, check out our book (with videos) that covers the ulnar nerve in more depth than this article alone (over 100 pages of content). Ulnar Nerve Book Here
Passive care is generally, “the things you have done or can do to yourself that take little effort or exertion.”
- Ice
- Heat
- Stretches
- Rest
- Braces
- Massage
- Adjustments
- Medications
- Injections
- Etc.
Do you see the similarities? You would never get physically exhausted from these being done on your body. In this article, I will be going over 16 passive care options I like for correction of hand numbness from ulnar nerve pressure. When they work, they can be magical and mind blowing!
Here are a few free podcast I did about ulnar nerve treatments:
- Ulnar Nerve Treatment Options (Restoring Human Movement Podcast)
- Ulnar Nerve Treatment Options Part 2 (Restoring Human Movement Podcast)
The active care category is often seen as a long-term plan so the problem doesn’t come back. Unfortunately, I know for a fact that most healthcare providers are missing the boat on this. I’ve seen so many people be able to decrease their hand numbness symptoms by just learning how to sit with improved posture. I’ve seen just as many have their hand numbness decrease with getting their shoulder blade to “lock on” to their rib cage better. Dare I estimate, that in over 90% of the patients I’ve ever seen with an ulnar nerve issue, the underlying cause is one of the following: poor movements, improper loading of overhead lifts, or sloppy postures. The other 10% are due to trauma (slip and fall, arm bars and stingers).
Passive Care Guide
Now, onto the things you can do… right now!
Ulnar nerve stretches, Active Release, and manual treatments are all ways we can decrease symptoms… but let’s not overlook correcting the mechanism of injury (why it becomes compressed in the first place). Some of the chapters focus on correction of movements, posture, positioning and more to decrease ulnar compression.
I’m Dr. Sebastian Gonzales, and I spent 42 hours of my life writing this guide to help you sleep better, among other irritating things that get disrupted in your daily lift.
If you are searching for some great, effective (although not permanent) suggestions on how to apply passive care for ulnar nerve condition, then you are definitely in the right place!
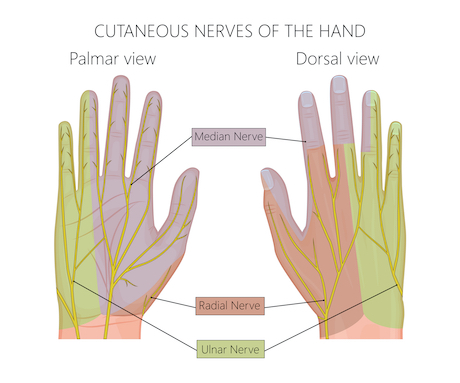
What is an Ulnar Nerve Entrapment?
Numbness into the ring finger and little finger are the most common symptom of an ulnar nerve entrapment. Ulnar nerve compression can be located within the elbow (Cubital Tunnel Syndrome), at the wrist (Ulnar Tunnel Syndrome), in the neck (nerve roots) or shoulder (brachial plexus). This can occur from bone spur formation, arthritis, disc herniations, nerve swelling, overuse and much more. Bone spurs can be the most frightening of the group since they are clearly seen on x-rays, however bone spurs need to be in the wrong place with the wrong motions to = numbness of the hand. Don’t let a random bone spur on an x-rays scare you. Let a medical professional review your images with you.
What is the best way to recover?
Putting active and passive care together is the most fruitful experience you can have in effectively treating and preventing hand numbness (if from ulnar nerve pressure).
Because of the length of this article, I’m not going to get much into ACTIVE care, which is the method I use to treat patients who want to get rid of hand numbness for good.
CHAPTER 1: Introduction to Treating Hand Numbness
Well, sorting through the treatment of hand numbness is a process, but that’s because of the variety of potential underlying causes for it which we have to review.
In this chapter, you’ll learn about the theory of how to comprehensively rehab and treat the symptoms of an ulnar nerve compression. HINT: This is the most important part for you to read.
Treatment of the ulnar nerve can be broken down into five parts:
- Find the site of compression
- Decrease local irritation (passively or actively)
- Decrease activity creating compression (until under control)
- Increase nerve’s ability to slide through (moving the nerve)
- Improve postural control, breathing patterns, movement patterns, etc.
This will be worth your time. It’s only a 5 minute section before we go into the stretch and passive care you came to see.
1. Find the site of compression
If it was a book it would be called The Ulnar Nerve Runs Through It. Locations of compression can be anywhere the ulnar nerve runs through. Think of a nerve as a garden hose. Any kink in the hose will affect the water flow, regardless of its location (aka pressure on the nerve). When considering ulnar nerve compression, it works much like the garden hose, but there are a few sites on the nerve that have high probability of becoming entrapped. The ulnar nerve runs through all of these areas
- Theory 1: Cervical disc injury pinching a nerve root (40%)
- Theory 2: Nerve root pinched by the posterior aspect of the cervical spine (30%)
- Theory 3: Shoulder “instability” creating pressure on the nerve as it passes through (10%)
- Theory 4: Cubital tunnel compression at the elbow (10%)
- Theory 5: Tunnel of Guyon compression at the wrist (10%)
As mentioned before, anywhere the ulnar nerve runs through, it can encounter pressure but as you can see there are locations that are more common.
There are also a few other underlying problems that can trigger “symptoms of an ulnar nerve compression.” Be warned, most of these are probably going to scare you; so seeing a doctor to confirm your specific cause is good prevention of unnecessary panic attacks.
I once had a patient experiencing numbness/pain in the ring and pinky fingers at night. In his case, the cause was a tumor in his spine.
Another young man came in and presented with bilateral (both sides) numbness and pain in his hands/fingers. This is one of the major signs (bilateral symptoms) of spinal cord compression.
The individuals involved in these cases both asked, “Hey, can you just treat it?” Of course, my answer was no. Cases like both of these must be referred out for further evaluation, treatment and care.
It’s sad and scary to hear horror stories like these, but the great news is if they are found early, then they can be corrected to some degree. Ignorance is only bliss for a period of time.
Moral of this story: you should know, with certainty, what is creating your symptoms. If you don’t, the muscles of the hand can end up wasting away, or even worse.
After we’ve screened out all the red flags, I often have my patients start to examine what changes their symptoms. To do this, I’ll have them keep all variables constant and only move ONE body region to a new position and hold it.
- From center, does a tilt of the head to the opposite side increase or decrease symptoms?
- From center, does dropping the chin to the chest change it?
- How about a shoulder shrug?
Do you see what’s going on here? We are localizing the area that has the greatest effect on the hand numbness. Everyone is different, and sometimes it’s not a position change, but rather a “stiffening” of a region. We will get more into stabilization in the eBook.
Locating the site of nerve pressure can be challenging. When we work with clients 1-on-1 we take a full medical history, perform a comprehensive physical examination, and look at any medical reports the person may have already (MRIs, nerve conduction studies, Xray, etc).
If you do not have imaging medical reports for us to review, don’t worry. Most people do not require MRIs, nerve conduction studies or X-Rays to reduce nerve pressure. A medical history and physical examination is the baseline for good nonsurgical treatments that work!
Many of our clients are surprised that we don’t need a nerve conduction study to begin care. I can not stress this enough … It is a common myth that this study is required to give medical advice and establish a nonsurgical treatment plan.
2. Decrease local irritation
Decreasing irritation of the region of nerve compression can be helpful in decreasing “flare-ups.”
In most cases, people are pretty aware of what activities or motions will trigger their symptoms. I’m never one to encourage a mindset of “avoidance,” but in this case, while we attempt to fully address the reason for the pressure on the nerve, holding off on those activities or motions might be a good idea.
If you’re thinking something along the lines of, “It happens when I drive. How can I not drive?” or some other activity that seems unlikely for you to stop entirely, then a little more effort is going to be necessary from you!
I strongly encourage my patients to break down every activity into its separate movements or components, and to find the EXACT reason for the flare-up. The more time we can get the nerve to “breathe freely”, the less pissed off it will be. It’s not always avoidance of an activity… most of the time it’s a simple modification.
3. Decrease activity creating compression (until under control)
This is very similar to the previous suggestion, but it has its key differences. Think of this as a hobby-related change.
It is not uncommon for ulnar nerve compression to present itself in overhead athletes, such as tennis players, baseball players, volleyball players, and more. However, the “hobbies” that need some adjusting are not just limited to sports and exercise.
This compression can present in writers, woodworkers, typists, and many more. Any activity that typically increases your ulnar nerve symptoms, needs to be decreased to some degree.
Can’t stop? Ask yourself “Why?”
For example, why do you play tennis?
Is it for exercise?
Then you can easily change your exercise routine and maybe choose to run for a few weeks while you work on your ulnar nerve problem. Do you play tennis to spend time with your spouse? Explore some other fun options of spending time with each other.
It may strike you as inconvenient, or maybe even “not worth it,” but thinking outside the box will help you find a suitable and enjoyable substitute, and this modification of activity is usually not forever.
Not sure what activity is creating pressure on the nerve? Many people find when the elbow is bent, they have hand numbness. Others find when they use their hands aggressively they feel it. Others find a combination of when the elbow is bent and when they are using their hand (working overhead). Perhaps writing down a list will help in this venture.
4. Increase nerve’s ability to slide through (moving the nerve)
After the symptom-inducing activities and the irritation to the region of compression have stopped, we can start getting the nerve to glide freely. This can be done with nerve gliding techniques, or… wait for it… by moving your body.
That’s right! The body is a beautiful thing. When it moves optimally, nothing will pinch, crush, ache, or go numb. Normally, we start with some nerve sliding (gliding) exercises in this phase and increase the amount of motion the person is doing. Isolated nerve gliding exercises are very helpful for enforcing more nerve slide through a stuck section.
Moving the nerve after it’s had pressure on it, is super important if you are to return to normal function again. Moving the nerve amongst the muscles and joints helps the nerve break free from other entrapment locations as well. Nerve movement happens as you play with your body again. Simple.
From here on out, the rehab starts to blend with phase 5.
5. Improve Postural Control, Breathing Patterns, Movement Patterns, etc.
If you got through that last section, you’ll remember that I mentioned moving better as a way of decreasing nerve compression. Think about it! When’s the last time you heard about a child having ulnar nerve compression? I know that I never have!
Sure, you can find some other reason to avoid the real answer… the answer that requires change… but look around. Take a look at your friends and family. I’ll bet that most of you can easily name at least 10 people in your lives who are older than you, and who do not have ulnar nerve issues.
Learning to move better is a process. Just like with any new subject or discipline, you have to start with the basics.
The foundation of healthy movement is having a properly functioning core. Achieving a functioning core starts with proper breathing. I know it sounds like a lot of BS, but really! Can you remember the last time you were exhausted from running?
When you stopped, you probably bent over, hands on the knees, and proceeded to breath hard for another few minutes. No amount of core exercise can train you to control your abdominal region when your breathing is labored. That is unless we learn to breathe.
Be sure to read through the chapter on balloon breathing if “how to breathe for better nerve function” sparks your interest.
Some of these types of activities can be taught at physical therapy, a rehabilitation facility, occupational therapy, personal training or a sports chiropractors office. Simple exercises with good coaching often reap great results!
CHAPTER 2: Adjust your sleep position for better sleep
Sleeping with numbness in the pinky is extremely frustrating. Learn how to make small adjustments like variables in a science experiment.
I can’t even begin to count the amount of times that I have been woken up by numbness in my right hand. This only ever happens to me when I sleep with my arm over my head.
How do I know?
Because as soon as I wake up and bring my arm down to my side, the numbness goes away and everything returns to normal within minutes.
I have no idea how long my hand was actually over my head before I woke up and felt the numbness, but what I can tell you is that my ulnar nerve entrapment is definitely increased in this position.
My first suggestion is to figure out what triggers your compression during sleep, and to stop sleeping that specific way. This is a chance to form new habits!
Here are some sleeping position changes I’ve found help some people sleep better, but everyone will have their own variations. I go over this in even more detail in my active care ebook.
Adjusting Sleeping Position
Adjusting Sleeping Position
Adjusting Sleeping Position
CHAPTER 3: Passive Mobilization of the Midback Can Decrease Hand Numbness
Having some issues activating those deep neck flexors?
Try mobilizing the mid-back, or you might even consider shelling out a little bit of cash to see your local chiropractor.
Stiffness in the mid-back, especially the upper-back, can make it darn near impossible to achieve functionality of the deep neck flexors and other muscle groups.
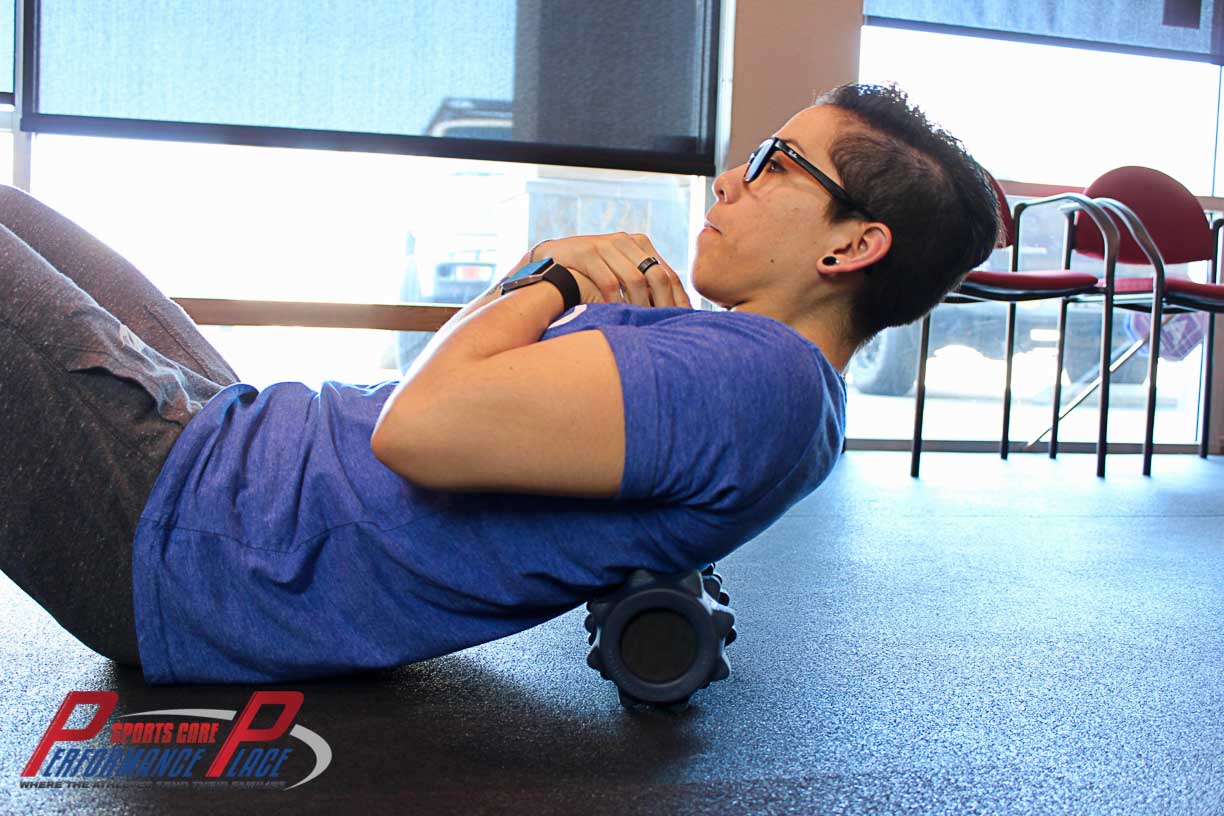
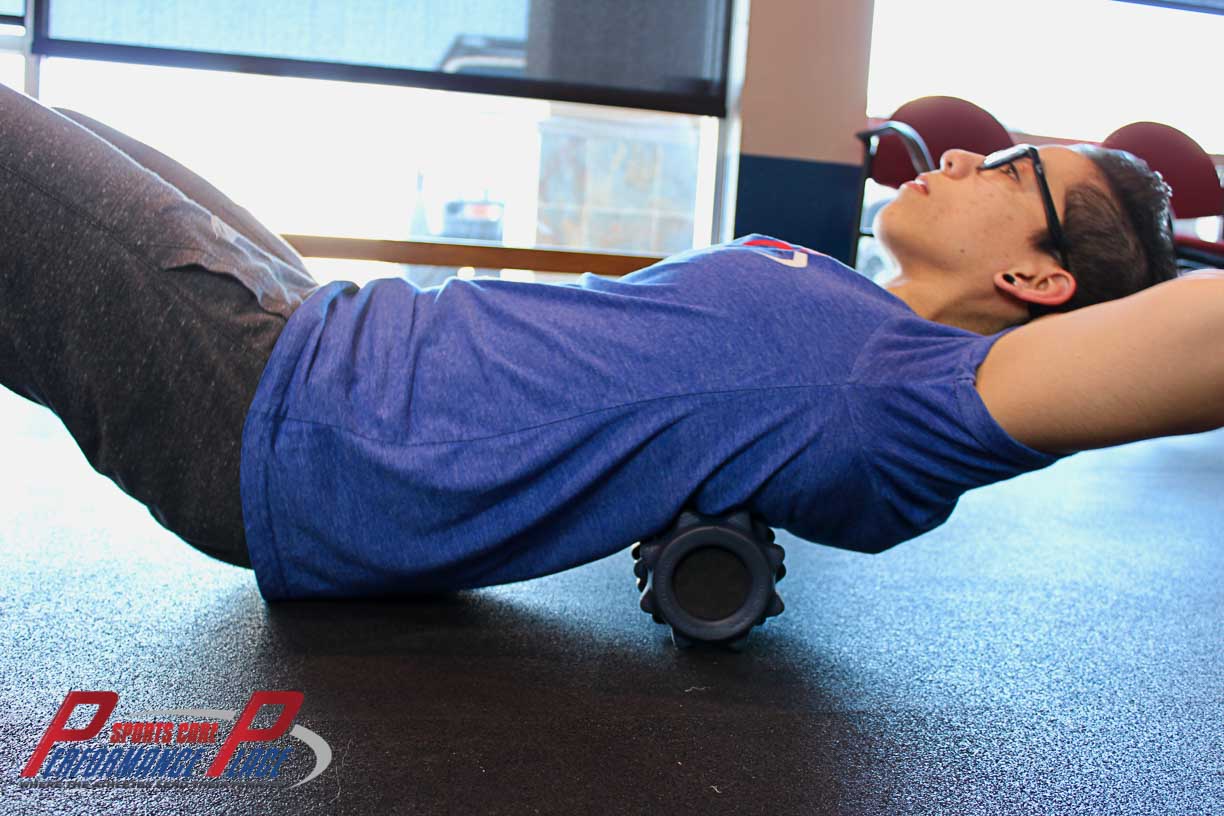
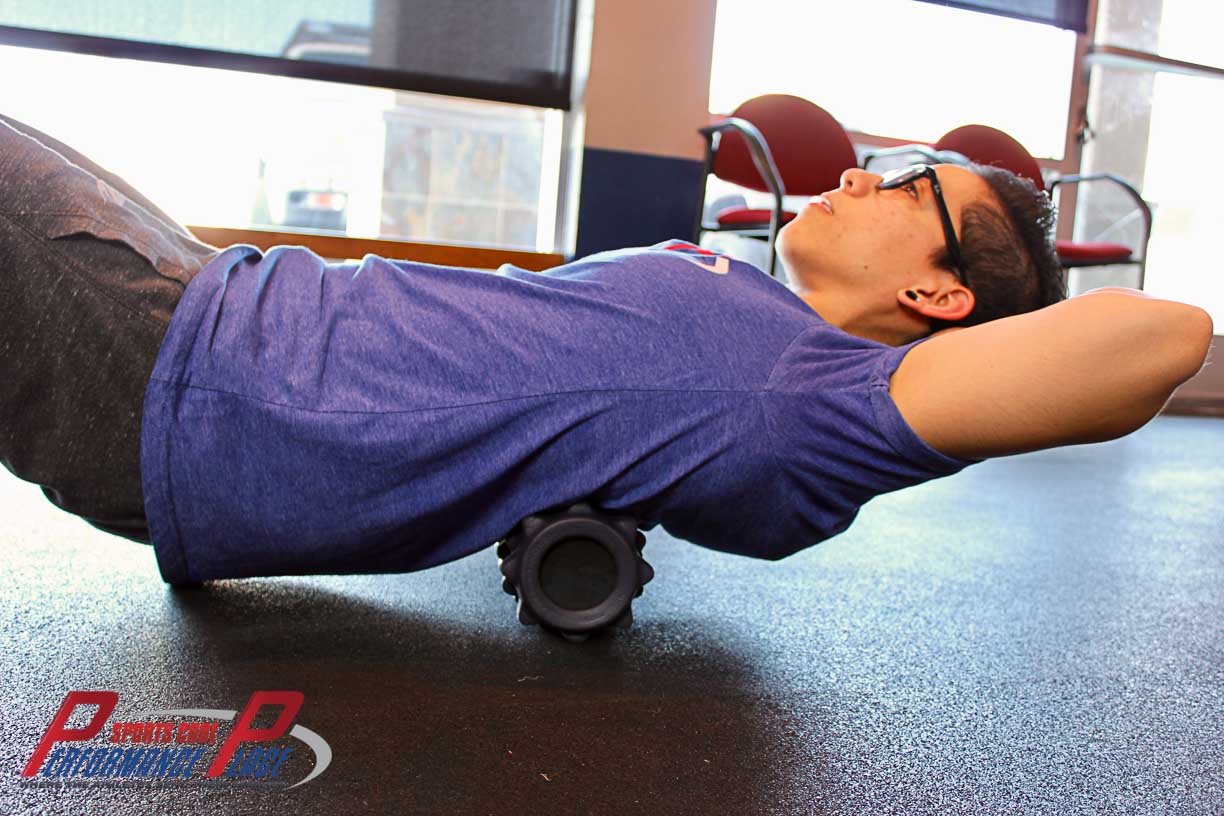
We can have someone else increase our passive range of motion for us or we can take a more broad approach by using tools, like a foam roller. A foam roller can never replace the expert palpation skills of a good manual therapist, but if you’re in a pinch, a foam roller is a good way to get some more reps into the area.
Passive range of motion increases should always be followed with active care exercise that’s designed to train the mind/body/strength/positional endurance connection needed to keep the range of motion for more than a few hours after the manual therapy is applied. Some manual therapists won’t agree with me in the last statement, but my stance is that no person can move your body better than you can…so let’s bridge that mind/body/strength/positional endurance connection.
Here is the foam roller video “self version” that I ask my clients to perform. (For the active care suggestion, check out my ebook.)
Here’s how we can do this on our own:
- Grab a foam roller and place it perpendicularly (to how you will lay your body) on the ground
- Lie down onto the foam roller and use it as a fulcrum to roll your body on top of the roller.
- Spend about 1 minute on each region that requires mobilization
Mobilization of the Midback
Mobilization of the Midback
Mobilization of the Midback
Mobilization of the Midback
girl-foam-rolling-pressure-low-back
Girl foam rolling for pressure in the low back
While foam rolling is a great way to passively improve midback mobility, the gains won’t stick unless you teach your body how to control it again in the ever-present force of gravity. Learning to sit well and offset the forces of gravity requires education and training… again, another segue to the active care guide we created to get rid of hand numbness for good.
Still not solid on the idea of working on the midback (thoracic spine) to affect the arm and hand?
That’s okay; all you need is a little education on the topic. Here’s everything need to know about the midback for the remainder of this article… side tangent!
Let’s start with the understanding that the spine is composed of a few regions, each with its own developmental abilities. Some areas are designed to move specifically in order to allow certain human motions to occur.
The thoracic spine, or midback, has been widely accepted as a key player in several conditions of the neck, shoulder, and shoulder blade. Poor upper midback mobility can also create pressure on the nerves of the neck, as the neck segments will be forced to move more than normal. And it is involved in more athletic motions than you can imagine.
Throwing a baseball requires your thoracic spine to work well, or else it will result in a shoulder injury. Similarly, if you’re not a baseball player, casting a fishing line requires the same skills. So does playing fetch with your dog.
Overhead motions require thoracic spine mobility if we want to save the shoulders and ulnar nerve from repeated trauma. I’m not just talking about lifting weights! So many motions of our daily lives require this same motion, but with lighter loads:
- Reaching up to get your seatbelt
- Pulling down a garage door
- Changing a light bulb
- Getting luggage off a plane
All of these can create hand numbness if you don’t have thoracic spine mobility and the ability to stiffen it when required… like using a larger fishing pole when you’re tuna fishing!
Ulnar nerve entrapment exercises, like this passive foam rolling, can greatly assist in opening the bony and soft tissue tunnels the ulnar nerve, and its contributing spinal nerve roots, allowing movement through them. Midback stiffness associated with prolonged sitting and lack of proper exercise can narrow these tunnels, creating enough nerve pressure to produce partial hand numbness.
Increased forward curvature of the midback is often linked to lifestyles that are heavily involved with certain technologies and/or social media scrolling (i.e. very sedentary that involve a lot of screen watching and sitting).
Forward rounding for a prolonged period of time, even just a few weeks in some cases, can lead to a compensatory curving of the neck and low-back.
Increased curvature of the neck, specifically, can lead to headaches, tightness, pain, and wouldn’t you know it… numbness in the arms/hands! I bet you thought we were getting off-topic, didn’t you? (Kolar, 2007)
This foam rolling exercise often helps build spinal awareness. Most people have no idea how to move their spine segmentally; this exercise will assist in this ability and yield more productive active care. During active care and other Big Picture movements, (ie: deadlifts, presses, core work, walking and more), you’ll know how to stack your body in the correct way.
Spinal awareness will also enhance ulnar nerve specific active care. I can’t tell you how many people I treat who say, “I don’t know how to move my spine that way.” Movement is a skill and it must be practiced often. It’s a process and awareness is step one.
References:
Kolar P. Facilitation of Agonist-Antagonist Co-activation by Reflex Stimulation Methods. In: Liebenson C. Rehabilitation of the Spine, 2nd Edition. Baltimore: Lippincott/Williams and Wilkins, 2007.
Supplementary section (click links to read immediately):
CHAPTER 4: CERVICAL SPINE MOBILIZATION / ADJUSTMENT
Let’s discuss the science of how mobilization/adjustment of the neck can decrease symptoms in the hand by taking pressure off of the nerve. Numbness of the fingers can also be related to a condition called a cervical radiculopathy.
Manipulation is often performed by chiropractors, physical therapists and osteopathic doctors. The slang terms are: cracking, adjusting, bone cracking, popping and more. Each provider has a different style and finesse about it. There are 5 grades of speed and amplitude so, if you require this type of care, a skilled spinal manipulator will be able to do the job (if necessary and not contraindicated).
In all honesty, a strong majority of people who come in with an open mind about their therapy won’t get cervical adjustment in my clinic. This is manly because I know that I can improve their condition in other ways, and I don’t want to push them into something they are uncomfortable with. But most of my clients don’t bust down my door looking for spinal manipulation either…perhaps it’s the people I attract? Regardless, here’s an article on the science of the cervical manipulation for hand numbness:
Supplementary section (click link to read immediately):
Actually, I didn’t really want to suggest cervical adjustment in this article, believe it or not. I am a chiropractor by degree, and the reason I did not want to include it is because, oftentimes, chiropractors can get pigeonholed as only neck docs.
However, through my research on how to fully activate the deep neck flexors, I came across an article that discusses the benefits of cervical manipulation in relation to the musculature there, so I decided to include it.
In my experience, some people have a fear of spinal manipulation (especially of the neck)…and that’s okay. People have different biases, experiences, and things that have worked for them in their life. There’s no one, single passive care therapy that’s the end all, be all, way to improve hand numbness.
If the idea of a neck adjustment scares you, I definitely suggest taking a look at the research. (Jull, Manual Therapy 2001). I’m not going to go into stigmas of adjustments in this article. That’s an article in it’s own right.
The cervical adjustment has can assist in treatment of people with a degenerative cervical radiculopathy, which you all should read as “hand numbness.” (Zhu, Clinical Rehab 2015)
In my opinion, manual therapy for mobilization of the neck and midback are a must, and should be tag-teamed with some active care immediately after. You can find more on active care in my eBook.
There are many ways to skin a cat. If your hand numbness is coming from your neck, we need an experienced sports injury provider to get the nerve “unpinched.” Here’s a video that demonstrates some cervical and thoracic spine adjustments that may be used for passive care symptom modification in cases of hand numbness. Here is a video of an adjustment.
Important section (click links to read immediately):
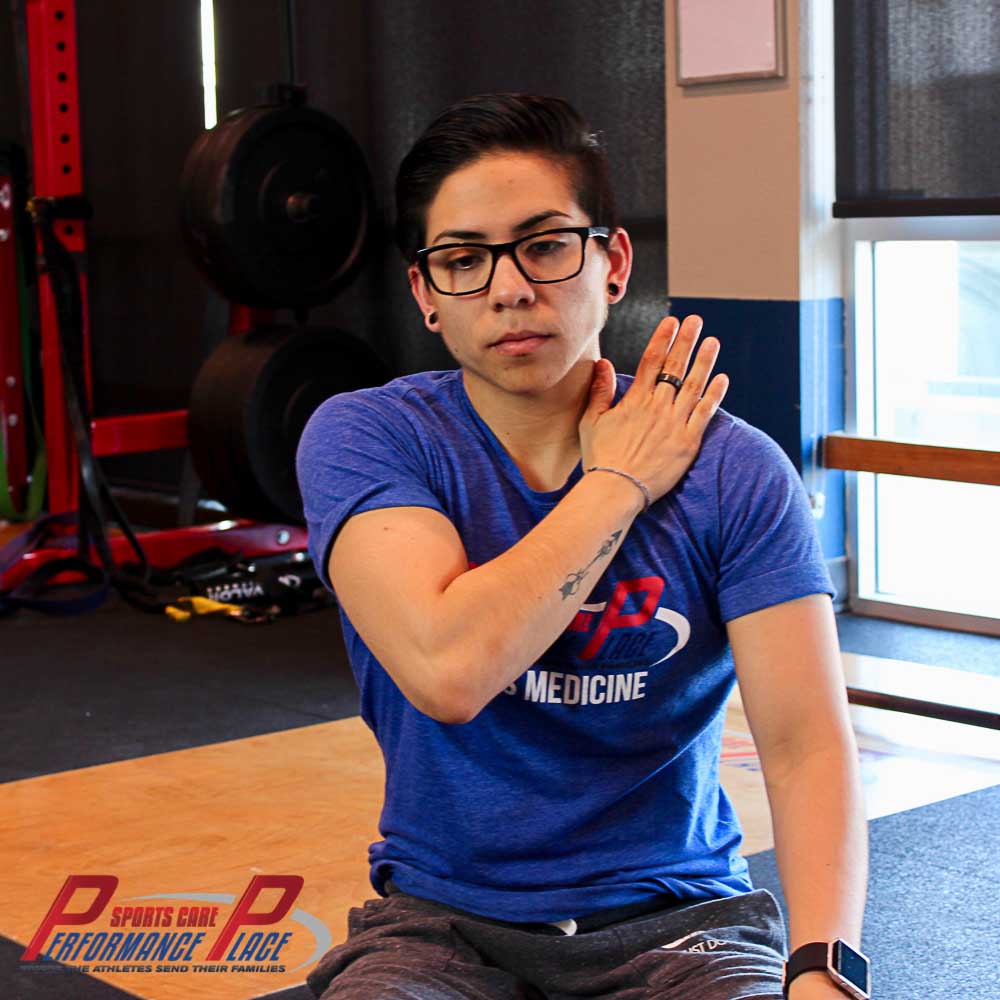
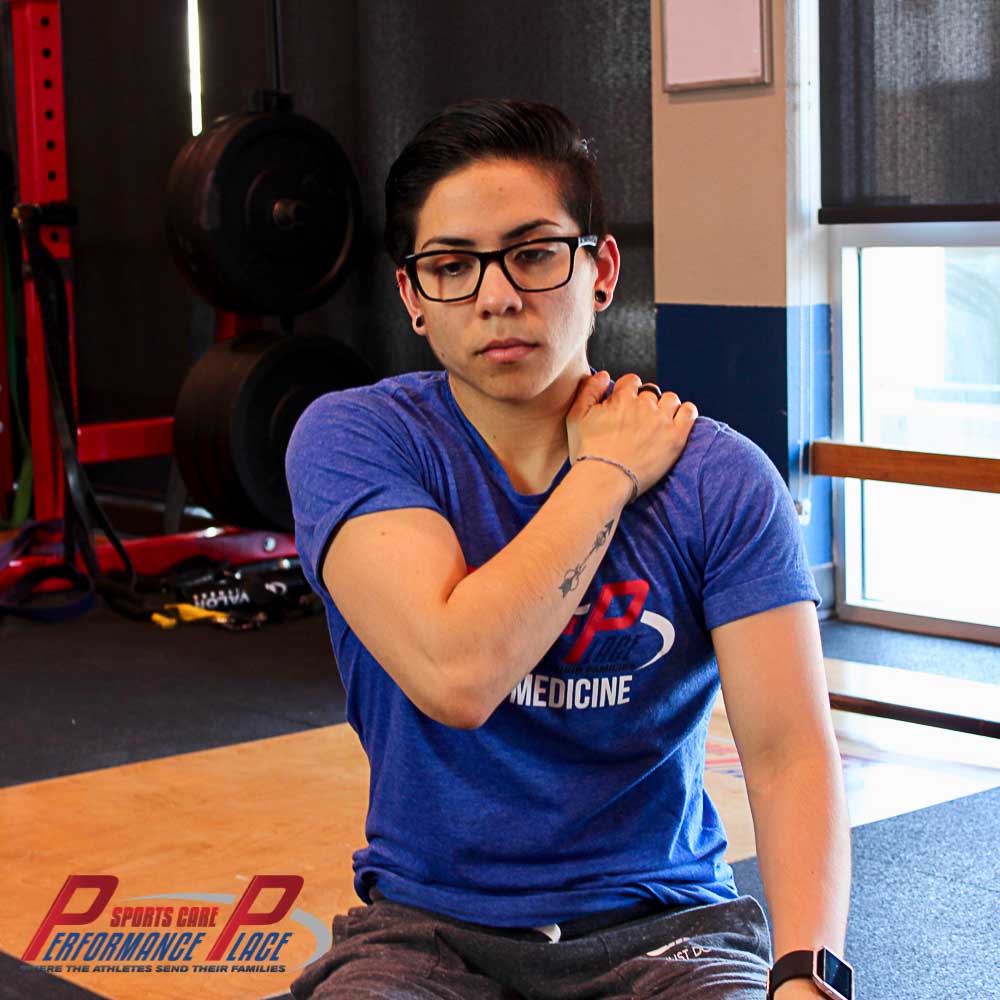
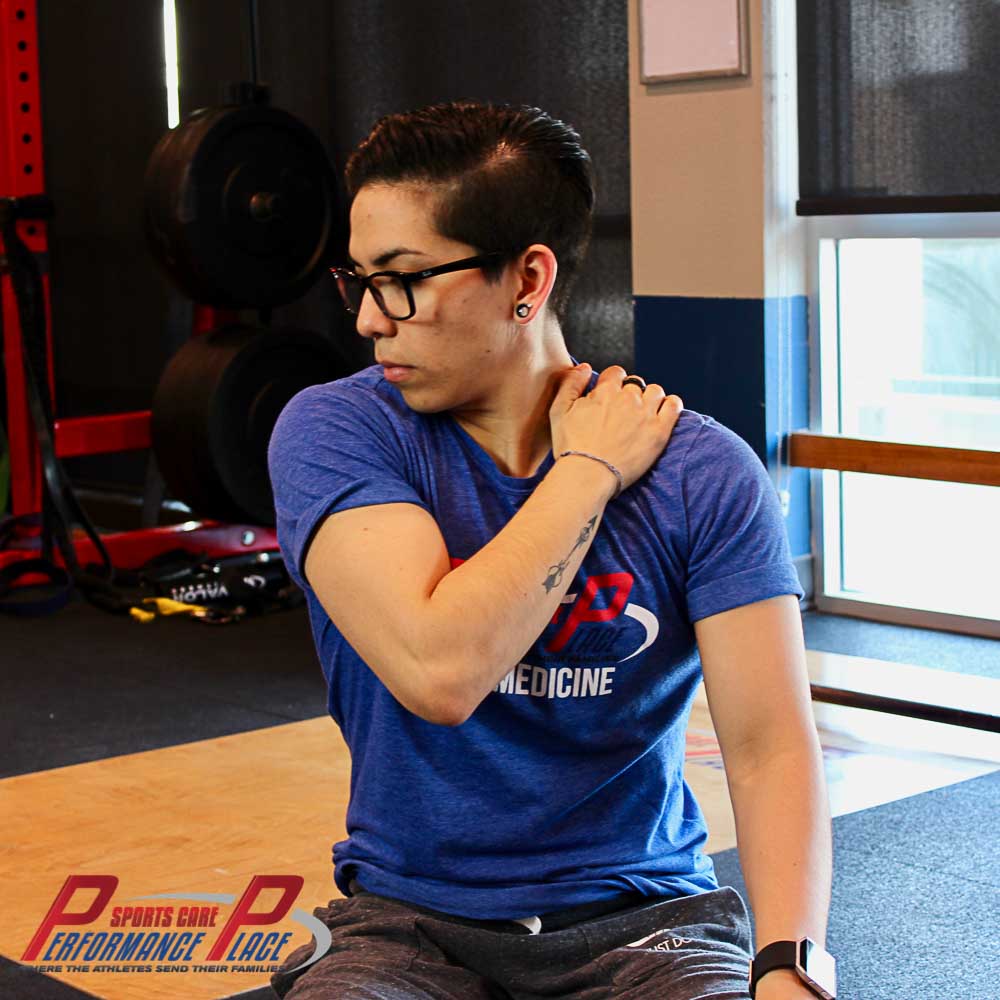
CHAPTER 5: MYOFASCIAL RELEASE OF THE UPPER TRAP, SCALENES, & LEVATOR MUSCLES
In this section, you’ll see some self-myofascial release methods that I’ll often suggest to my patients so they don’t wake up to a numb pinky finger. Myofascial release is a form of treatment where we improve local soft tissue structures (in this case, muscle and fascia) so they’ll allow the nerves to move amongst them as they would in an asymptomatic person.
Important section (click link to read immediately):
Myofascial release of the upper trapezius (aka “upper trap”), the levator scapulae (aka “outer neck/shoulder muscles”, and the scalenes (aka “side of neck muscles”) can assist in decreasing muscle tone, or as many patients refer to it, “tightness.” Directing care to the tight muscles is not always indicated, but can help in cases where the muscles are feeding into the local inflammatory cycle. When this isn’t the case, inflammation is generally created by nerve-derived chemicals, yet local myofascial work typically helps with symptom modification…which is a great thing.
Each of these muscle groups can have either a direct or indirect way of increasing numbness of the 4th-5th digits (i.e. the ring and pinky fingers).
The upper trapezius and the levator scapulae muscles have more of an indirect way of creating ulnar nerve compression. The theory is that since these muscles attach the spine to the shoulder blade, they can actually have an affect on shoulder function.
Compensated motion can root from the shoulder. Past history of shoulder impingement or SICK scapula often times will create compensated movement that results in ulnar nerve entrapment. This compensation can then lead to dominant activity in the “shoulder/neck” region. Therefore shoulder function can lead to ulnar nerve sliding issues, ulnar nerve tension issues and changes of sensations all the way to the inner part of the hand.
The shoulder blade complex is attached to the chest wall on the front side via a muscle called the pectoralis minor, which is in very close contact to the brachial plexus and the blood vessels traveling out toward the hand. Excessive tightness of the pectoralis minor muscle has been correlated with a condition called Thoracic Outlet Syndrome (TOS), which also yields loss of sensation to the 4th and 5th fingers… funny how that works, huh?!
Is it possible someone could have TOS and not an ulnar nerve entrapment? Maybe, but I typically look at how the body functions mechanically first and then label the remaining pieces.
Why am I targeting to TOS? I’m not really. It is just to illustrate the point that the muscles of the shoulder girdle all work together. Tightness of one muscle can create tightness of another merely by altering the position of the shoulder blades. More to the point, if you have hand numbness, we can’t overlook the potential connection to the shoulder blade because of it’s very close relationship with both the brachial plexus and cervical spine.
Now, onto the scalene muscles…why are the scalenes important?
The scalene muscles are a group of three muscles that originate from the neck (cervical spine) and attach to the ribs. The brachial plexus (nerves around the neck) physically pass through these small muscles (before they pass the shoulder girdle) and can become compressed when their tone increases or if the slide between them decreases. The scalenes become overly tight in people with chronic respiratory issues. But, they can also develop excessive tightness in people who just have poor breathing patterns.
Chest breathers–people with excessive rise and fall of the shoulder with breathing–often use these muscles to inhale. Restoring normal breathing mechanics can be very helpful for reducing tightness of the scalenes when practiced early and often in rehab. I typically have my ulnar nerve patients do “mindful breathing” practices multiple times throughout the day until it becomes as easy as breathing poorly was. Without going too far into the breathing tangent, just know the scalenes are often tight for a reason and focused tissue work can help decrease tightness for small periods of time.
Myofascial release of the scalenes will yield windows of time for the neurological structures to “breathing freely” so normal nerve function can be restored. Remember, nerves function almost like garden hoses. If you take your foot off of it, then your roses at the other end of the yard will get more water and can grow better.
Hopefully, this has given you a pretty clear picture as to how the scalene muscles are able to directly compress the ulnar nerve via the brachial plexus.
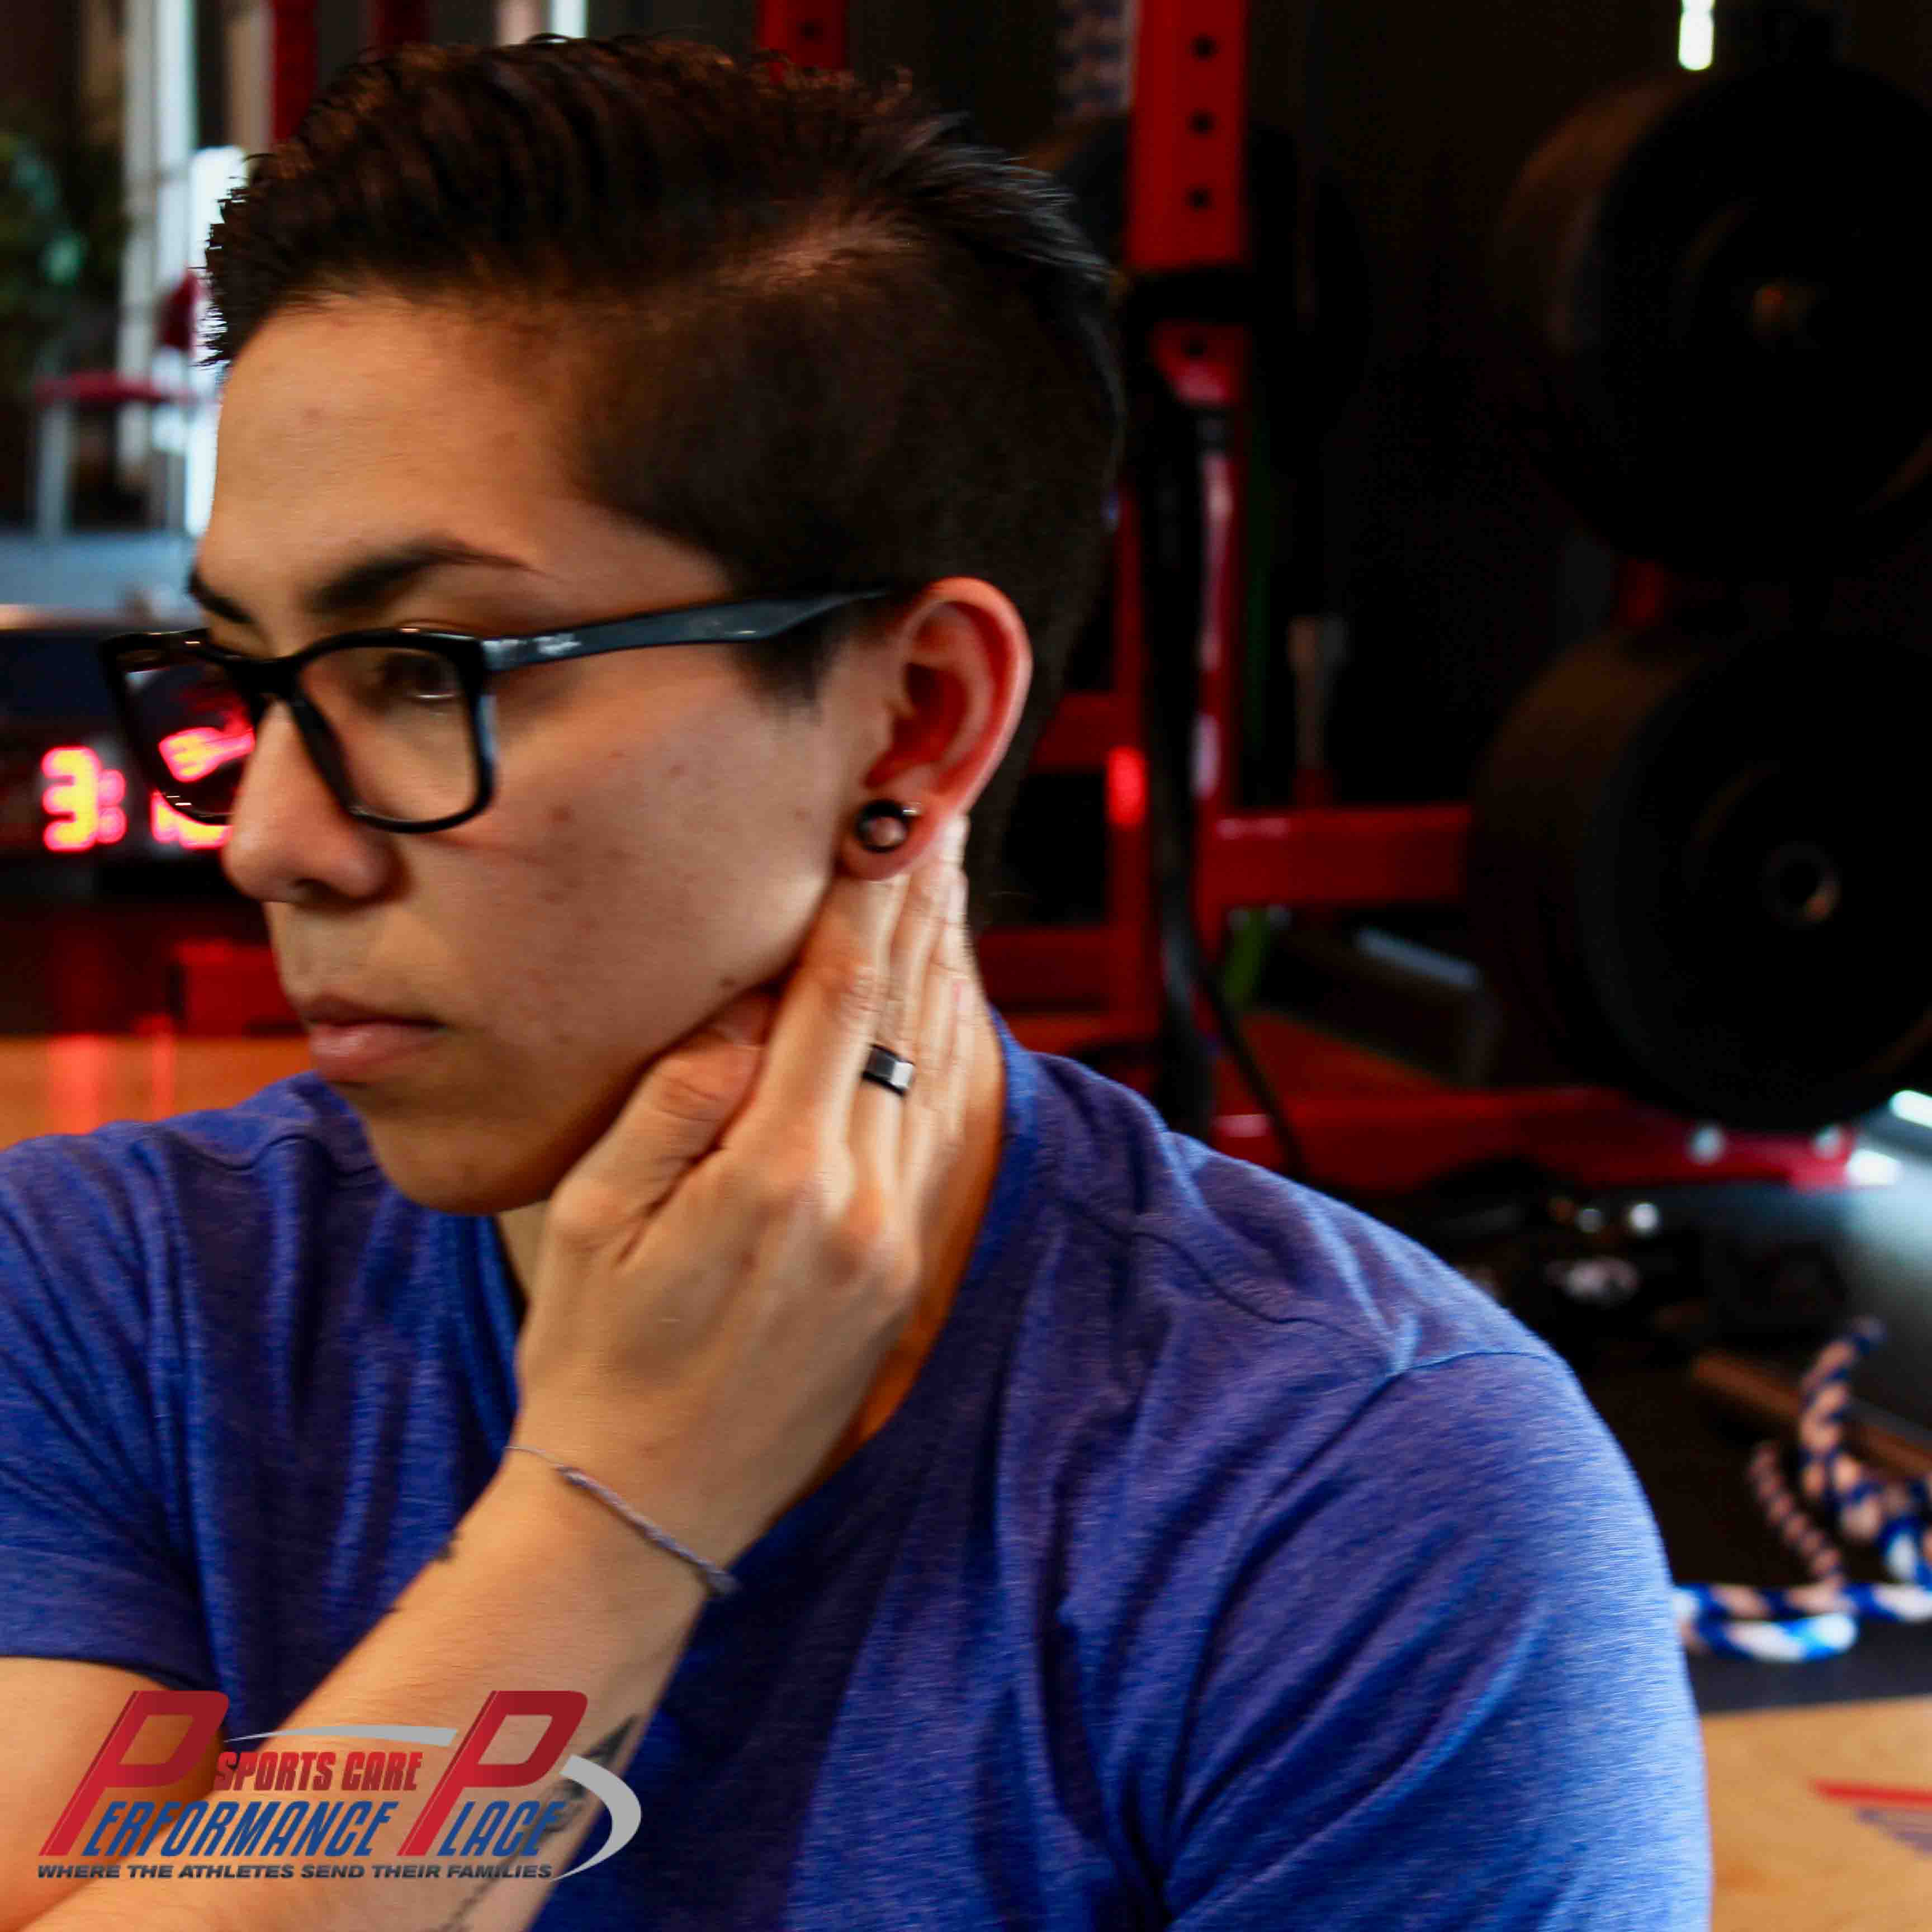
The following “flip book” style presentation is one way to lightly release the scalenes, in an effort to release the brachial plexus. In our facility, I personally treat all muscles of the neck. I don’t allow the patient to do it on their own because there are many veins, arteries and nerves in this location.
Most people opt to have this muscle/nerve interface treated professionally because of the amount of discomfort they feel at home. Most have way too much pressure and skin pull. It feels “zappy” or “stingy” so people tend to stop until they feel more comfortable about what they are doing. I use a style of treatment called Active Release that works extremely well in these cases, and is way more comfortable than 10 minutes of someone throwing an elbow into your neck. If you live in Southern CA, come in and pay me a visit.
When I’ve had an issue with scalene muscle tightness, I’ve used this self-treatment, but I have also been well trained in anatomy. It normally takes me two minutes a few times a week and I’ll see great improvement. Again, if you have hand numbness, you need to see someone soon to prevent hand wasting.
Finding the correct anatomy in the area starts with knowing local anatomy. I use the opposite (contralateral) hand because it allows for the pad of my fingers to be the contacts.
Here are the steps I take:
Step 1
Find the Sternocleidomastoid muscle via light contraction and move the pads of fingers posteriorly while pulling extra upward skin traction.
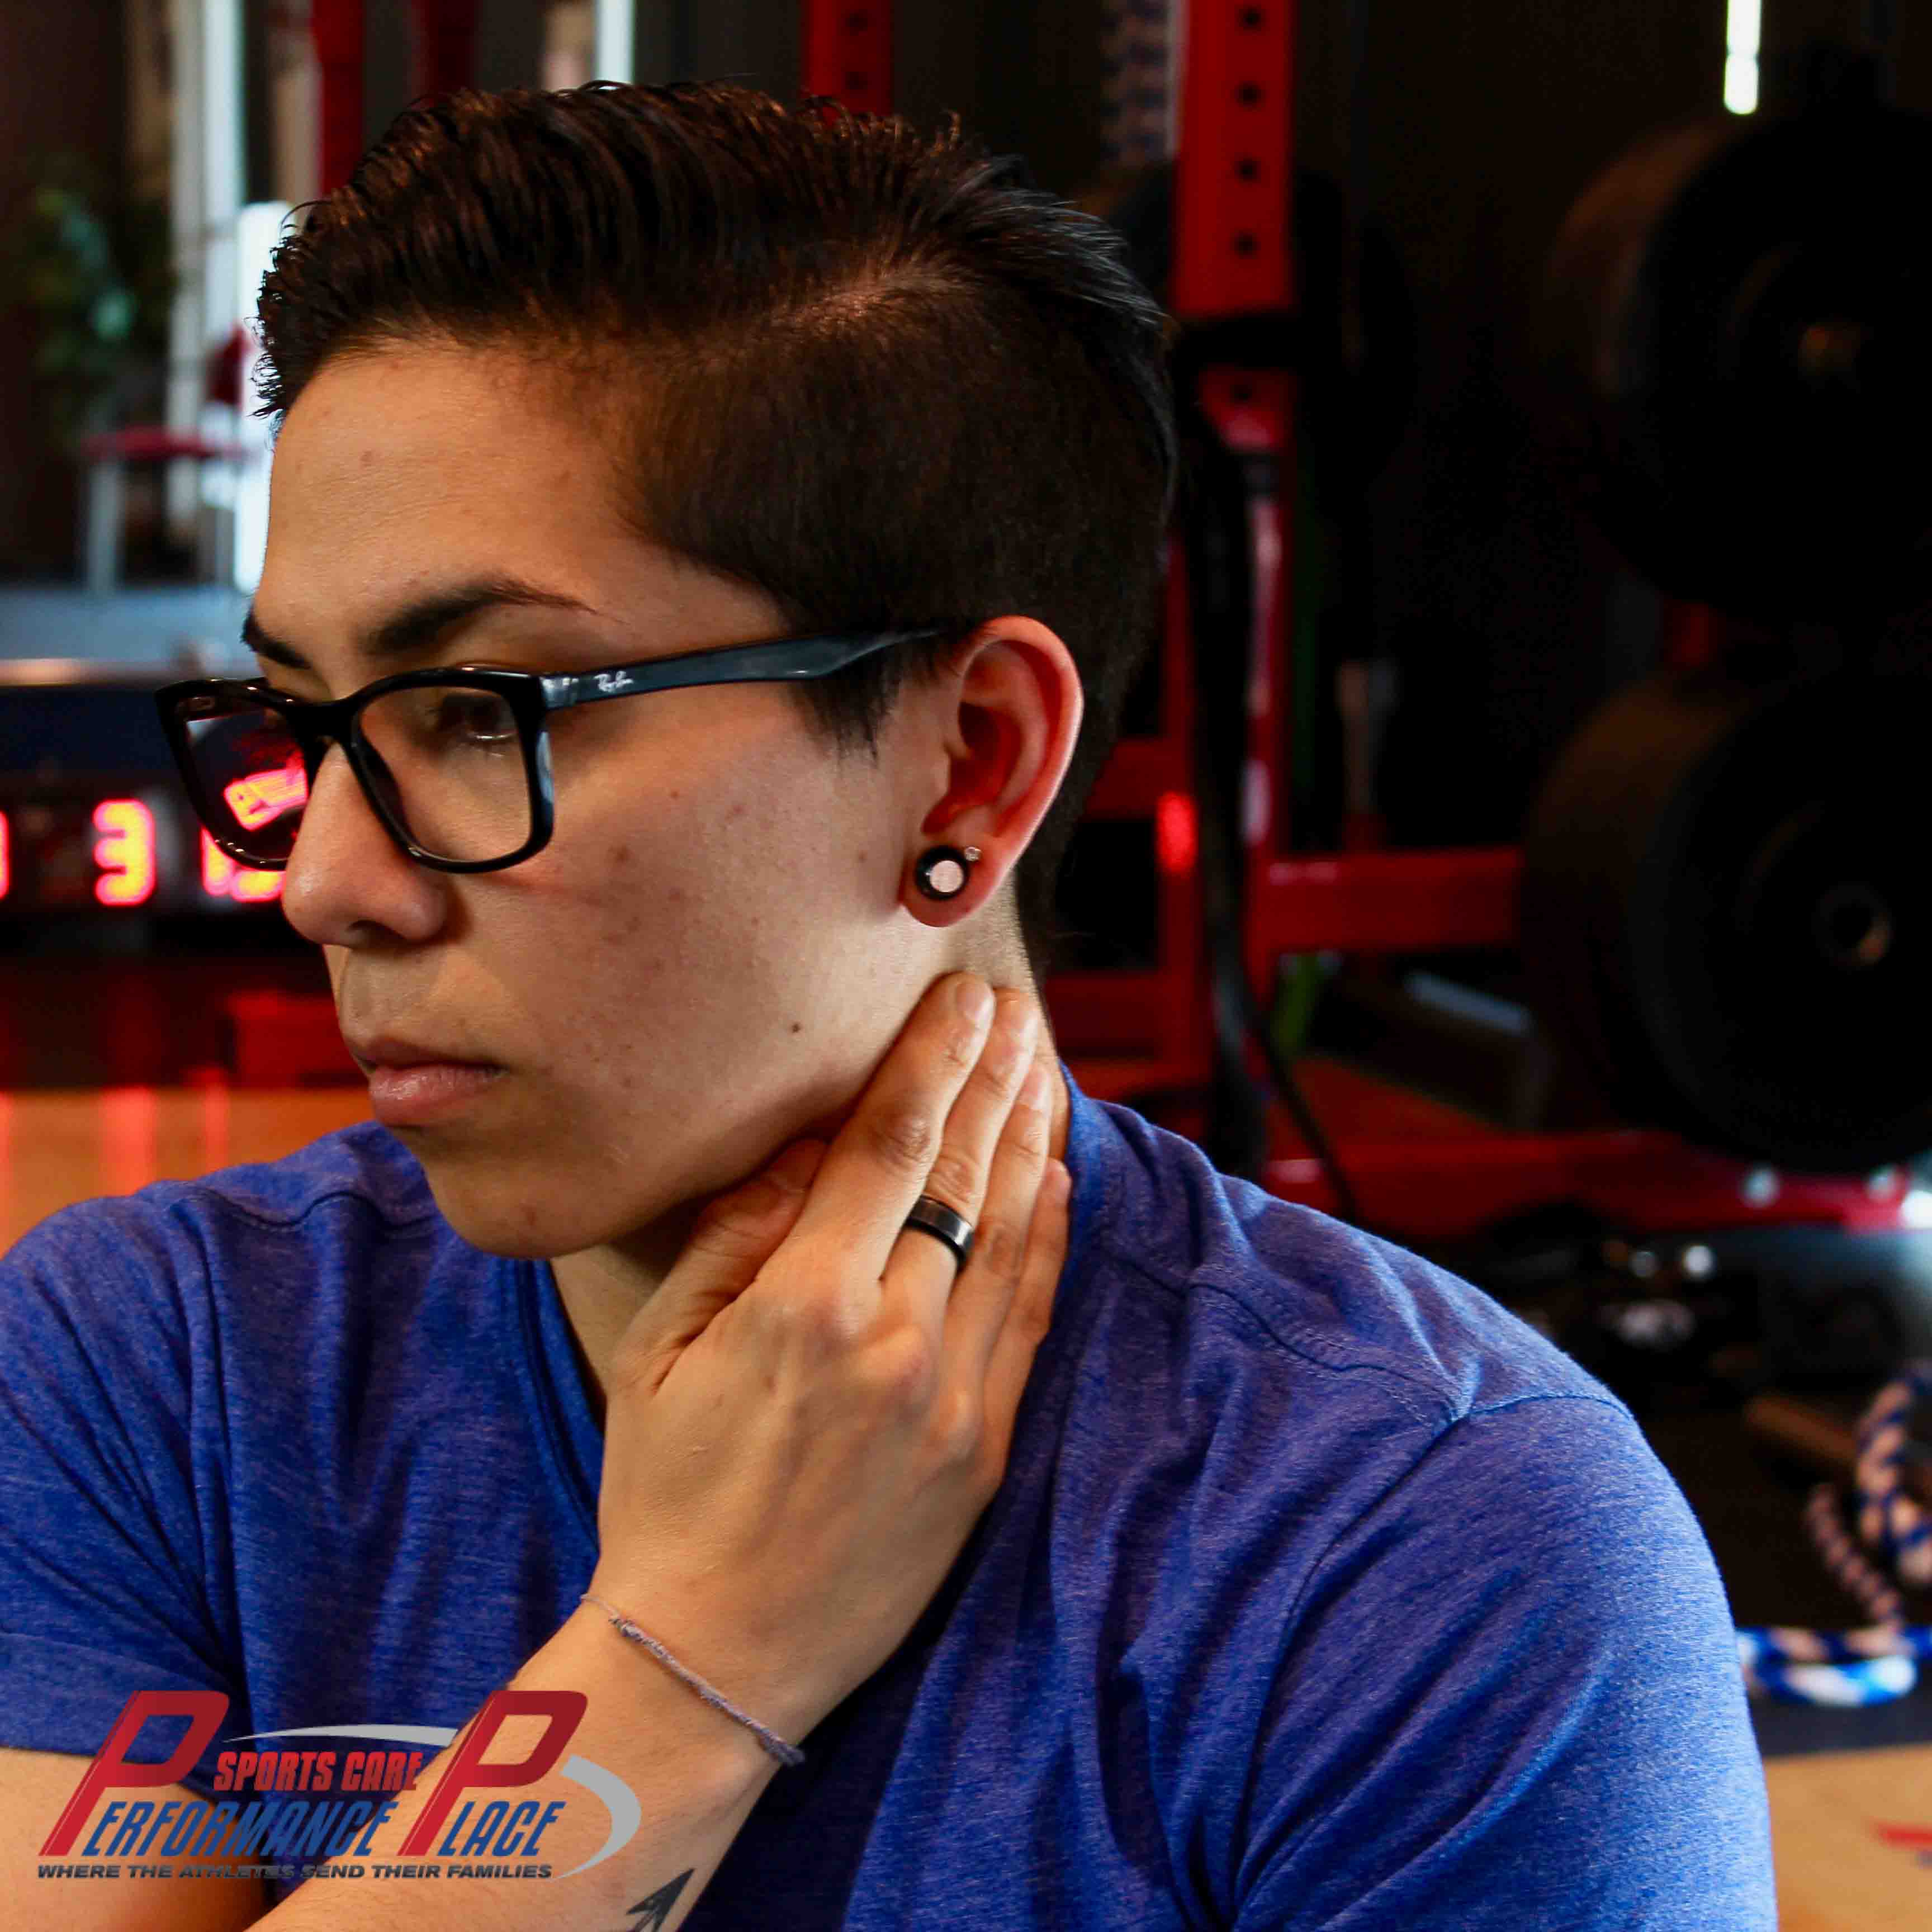
Step 2
Slip the pad of the fingers on the small ropey (non pulsating or zappy) structures on the side of the neck.
Step 3
Lightly move the contact downward in a stroking manner towards where I lose contact with that same muscle.
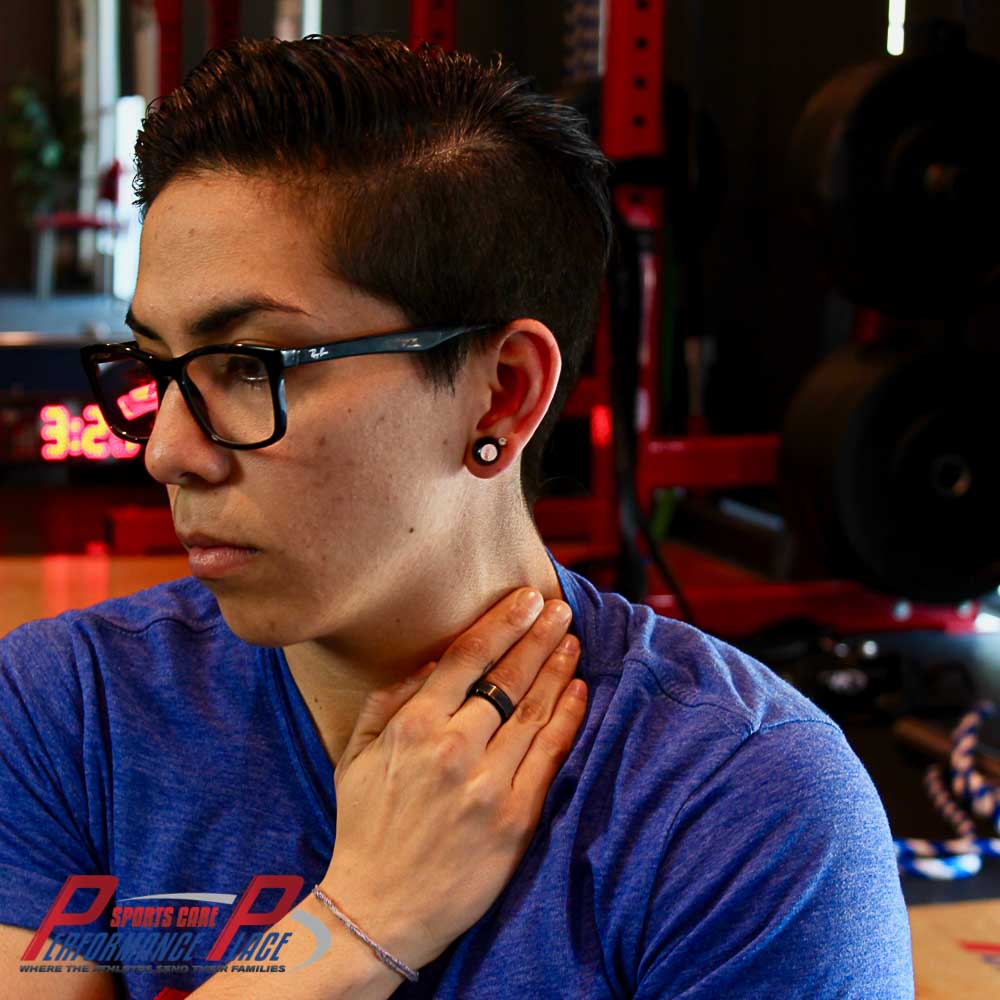
Step 4
Repeat
Ya, it’s complicated right? That’s why it’s best to just have it treated professionally first.
MYOFASCIAL RELEASE OF THE UPPER TRAP, SCALENES, LEVATOR MUSCLES
MYOFASCIAL RELEASE OF THE UPPER TRAP, SCALENES, LEVATOR MUSCLES
MYOFASCIAL RELEASE OF THE UPPER TRAP, SCALENES, LEVATOR MUSCLES
This next “flip book” is how you can self-treat the upper trapezius and levator scapula around the base of your neck. These muscles attach the shoulder blade to the neck. When “tight” and shortened, they can affect the brachial plexus as they exit the neck region.
Here’s the steps I take:
Step 1
Using the opposite (contralateral) hand, lay it just over the shoulder to allow for contact of the finger pads on the trap region.
Step 2
Draw skin slack from the lateral shoulder for comfort
Step 3
Hold firmly and turn the head way
MYOFASCIAL RELEASE OF THE UPPER TRAP, SCALENES, LEVATOR MUSCLES
MYOFASCIAL RELEASE OF THE UPPER TRAP, SCALENES, LEVATOR MUSCLES
MYOFASCIAL RELEASE OF THE UPPER TRAP, SCALENES, LEVATOR MUSCLES
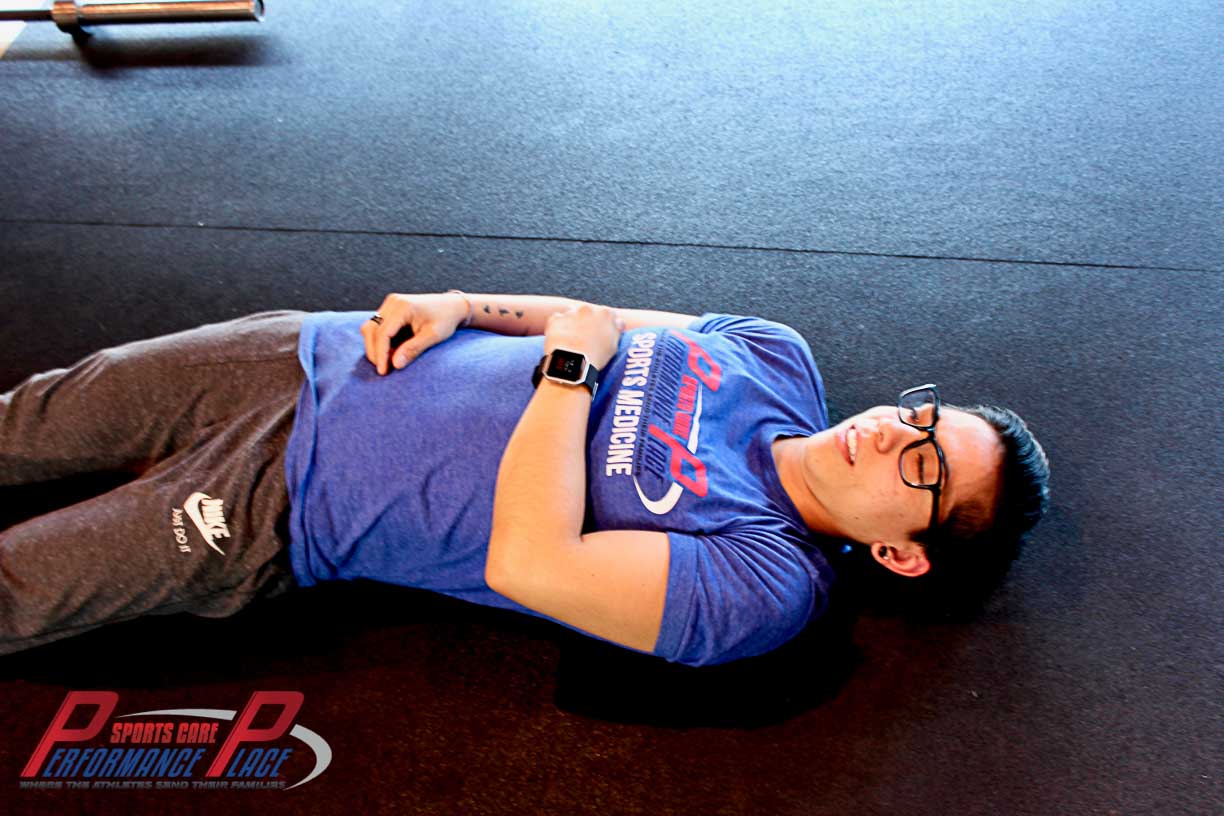
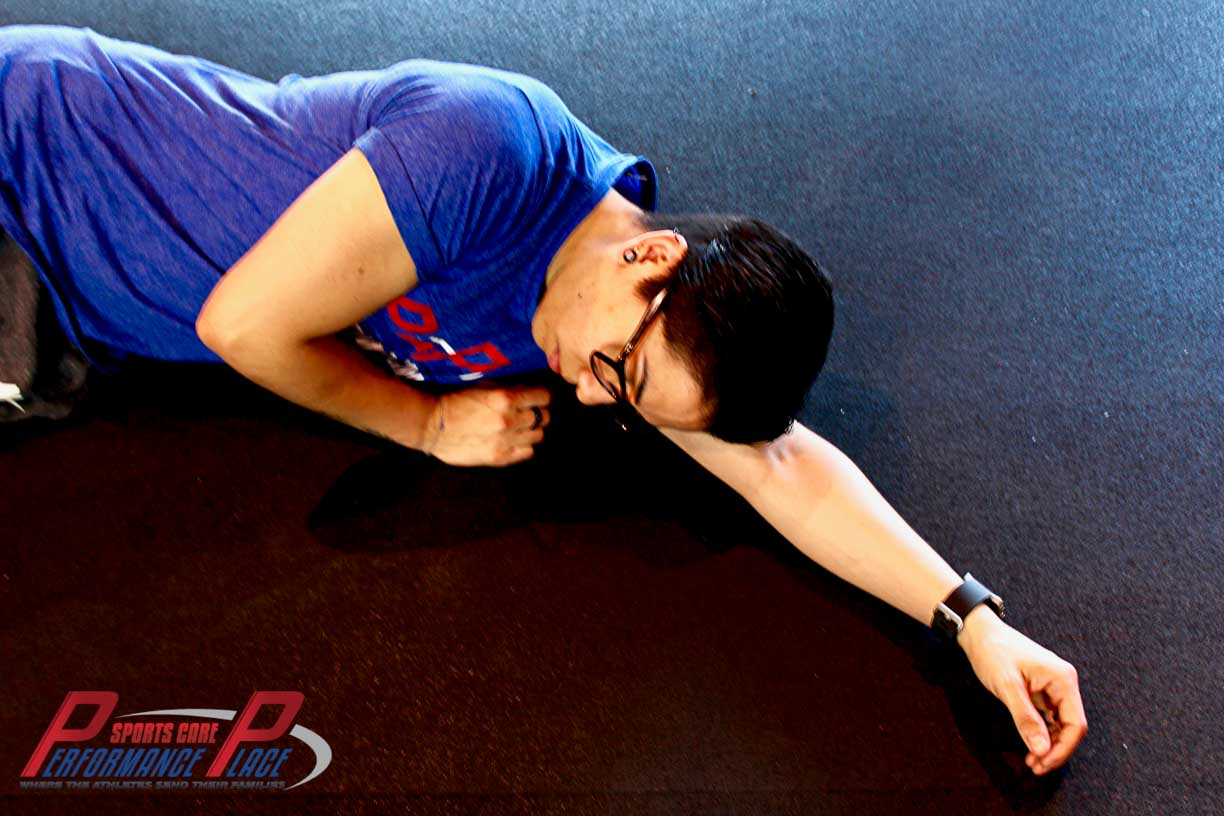
Also, spending a few minutes on a lacrosse ball or baseball can help this area too. This is how I demonstrate it in my clinic:
While laying on your back, place the ball as far up the shoulder as you can while still keeping pressure…if you go too far the ball will slip out. Note the hip drive toward the sky; without lifting the hips, you will not feel a thing.
I normally stay in this position for no more than 3 seconds of so because the ball creates a lot of contact. In some cases, people can’t tolerate that much pressure so we need to do it on a softer surface like a thick mat or carpet. The body remains still while the arm moves.
Since it’s pretty aggressive, I only do it for a max of 90 seconds during a day and often times skip days at a time. Doing it too much will create internal bruising and soreness.


Notes on professional assistance:
In my personal experience with aches and pains, I’ve found a ton of success using home-care strategies, but I’ve also found at some point there is a plateau. Breaking through to the next step in recovery sometimes requires the manual therapy skills of people who’ve mastered them over years of practice.
Here are a few types I like to suggest when people contact me:
- Active Release
- Tool-Assisted Tissue Work
- Fascial Manipulation
- Deep Tissue work
All recommendations are case and person dependant.
NOTE: This compression therapy, like some of the examples within this section, actually makes some cases worse… why? It’s a great question. The answer is that all cases are not the same. This type of treatment strategy is compressive in nature. Nerve flossing and Dermal Traction Method are examples of decompressive ulnar nerve symptom modification strategies. For anyone who’s been dealing with 4th and 5th finger numbness or pain, it’s imperative that you find which style of treatment is best for your case. When you do…wow…things often get better by leaps and bounds! I’ve met people who’ve had nerve pain for months, during which they tried all of the wrong therapies, yielding no resolution. Once they found the correct one, it was off to the races!
Before leaving this section, it’s important to touch on the other side of the coin in this type of situation involving “tightness of muscles”. Improving the function of a muscle doesn’t always require making it longer or more flexible. Many times it’s exactly the opposite. Instead, we need to make it contract at the “right place, right time, and for the right duration.” Facilitation of muscles that have been “turned off” can often work synergistically with the myofascial work we just discussed. Since we are still talking about the shoulder blade, we can all probably agree it would be nice if all of the muscles in the area worked together collectively to make its job easier.
Reaching for an item in a cabinet above the stove shouldn’t be the burden of just one muscle. In reality, simple movements like this are the end result of muscles and joints working together in a choreographed dance that should be done pain-free without much conscious thought or effort.
The muscles that often get lazy in this dance are:
- Middle trapezius (“upper back muscles”)
- Lower trapezius (“low trap”)
- Serratus anterior (I don’t the laymen’s)
- The phasic postural muscles (discussed in another article)
Training these muscles to function well on a subconscious level is key to resolving most shoulder blade dysfunction tied to hand numbness and ulnar nerve issues.
Sorry, that was a huge section. I go into all of the ways to use active care to address this concept in the Ulnar Nerve ebook.
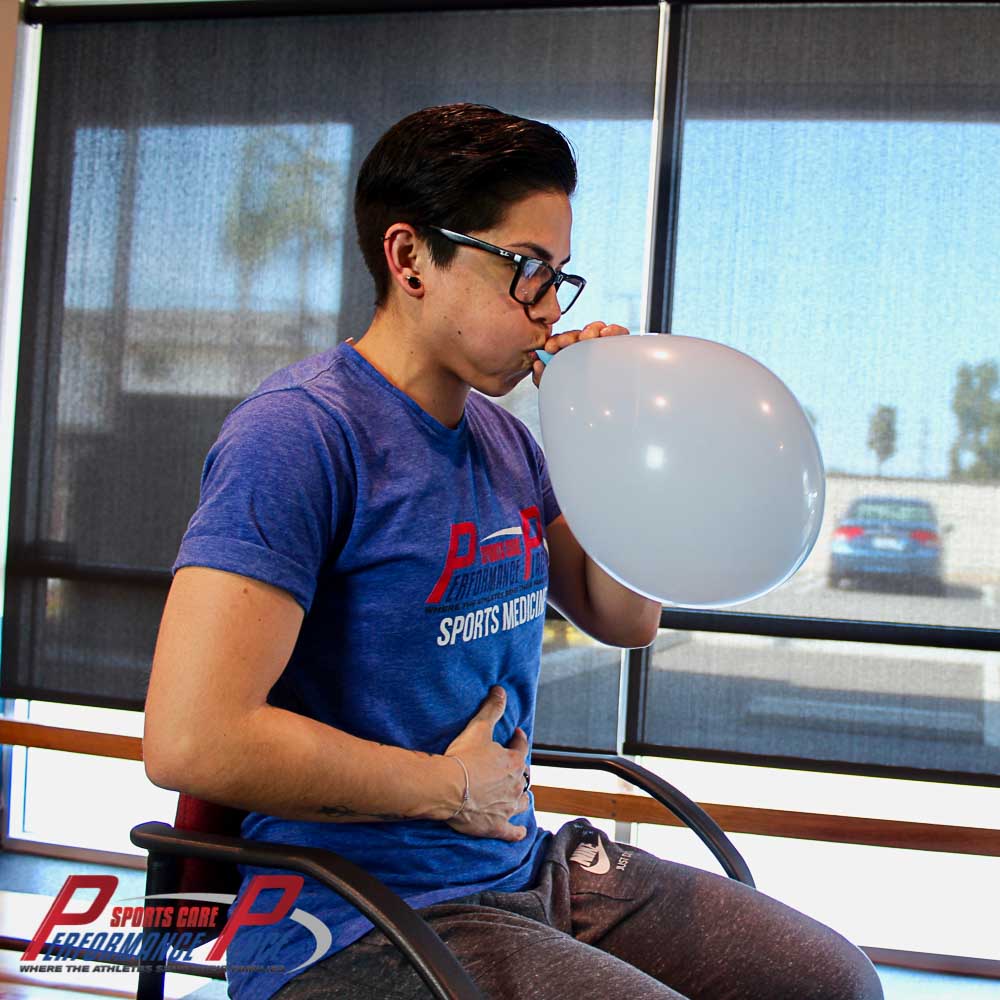
CHAPTER 6: BLOW UP A BALLOON
Just as we mentioned in the scalene section, the scalene muscles can often crush down on the nerves of the brachial plexus, which can then lead to direct compression. Remember we talked about how the scalenes can also assist in inhalation? This is where were can get into some applications of how to use something simple like a balloon to improve your breathing pattern (without comorbidities), decrease the scalenes’ workload and allow the nerves to “breathe freely.” I exclude people with respiratory disorders from this category because they have much more complex conditions that require more management than a simple just “hey, you should breath into a balloon.”
Some of you might be wondering why these muscles become so tight in the first place! Well, figuring that out requires a little bit of thought in regards to what they attach to. The scalenes originate from the cervical spine and attach to the rib cage. They can be used as breathing muscles, especially in “chest breathers.” Since small muscles like the scalenes are not designed to take on such a tedious and demanding job like breathing, they tend to become “overworked”.
Believe it or not, there are incorrect ways to breathe. Even better, there are great methods for learning how to breathe correctly and properly. Learning to breathe properly is as simple as blowing up a balloon, literally!
Spending 5 minutes a day (broken up into 1 minute bits) blowing up a balloon with deep forceful exhales is one of the easiest ways to learn.
Try blowing it up with as few breaths as possible.
I know, I know. This probably seems like a fairly ridiculous suggestion.
BUT, this simple technique is training you to use your deep core muscles, diaphragm, and pelvic floor muscles in your breathing. I promise, this method of breathing is much better for you.
Five minutes of this balloon breathing right after five minutes of midback mobilization could, quite truthfully, change your life.
To show everyone what I’m talking about, I’ve made a video on how to balloon breath. Enjoy!
Once it has been mastered on the ground, we need to bring it to life… sitting, standing, walking etc. Since many people spend their day sitting around, I like to have them get straight into a chair after spending a minute on the ground. We are just laying some foundational work when you’re on the ground.
Can we just jump to the chair version? Some can, but most people have issues with being aware of expanding the abdominal cavity from a 360 degree aspect. They need to have a solid contact point…in this case, it’s the ground. That’s why I start people on the ground, but allow them to move to a chair as soon as possible.
Here’s a flipbook version of the seated variety:

Blow up a Balloon Breathing
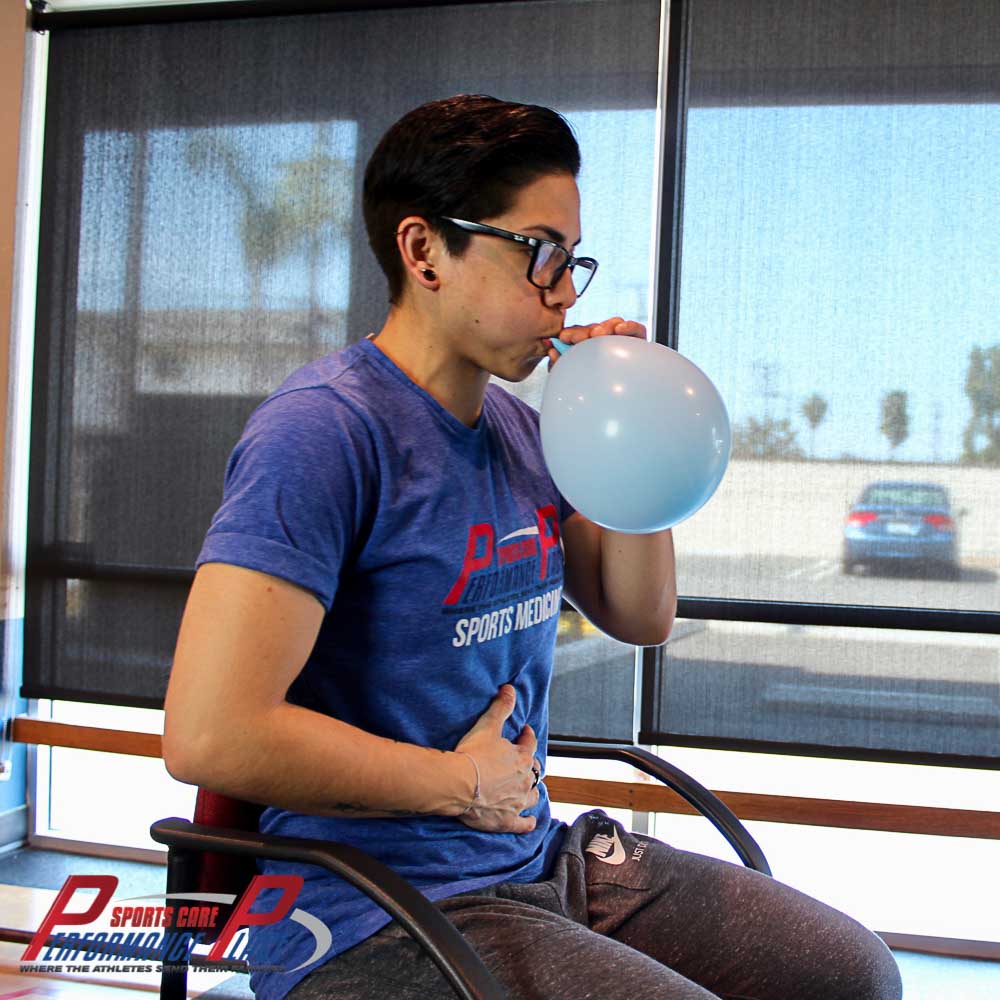
Blow up a Balloon Breathing
INTRA-ABDOMINAL PRESSURE BACK
Important section (click links to read immediately):
CHAPTER 7: Myofascial Release of the Elbow for Cubital Tunnel Syndrome
In this section, let’s assume that the ulnar nerve is compressed below the shoulder and above the wrist.
Myofascial release of the muscles, tendons, and fascia surrounding the elbow, can greatly improve ulnar nerve compression in the elbow. It’s not uncommon for some of the local soft tissue to become inflamed. This can happen for a variety of reasons, but whatever the reason, the ulnar nerve typically gets caught up in the mess.
Myofascial release, in the case of nerve compression, is mostly about improving the slide of the nerve within the surrounding muscles and other soft tissue structures that create tunnels and compression sites. A little bit of compression on a nerve is fine, it happens to healthy nerves all the time, but when a certain threshold is passed, then symptoms can occur.
Myofascial release of the inner elbow region can decrease symptoms within a matter of minutes if you are being treated by a skilled provider. However, the severity of the case at hand is also a factor in the recovery timetable.
Some locations that I like for myofascial treatments are:
- The wrist flexors (the common flexor group and the flexor carpi ulnaris)
- The triceps (using a barbell)
- The pronator teres
Let’s start with the wrist flexors:
Look through this like a flip book and you should get the idea.


Now the pronator teres.
Look through this like a flip book and you should get the idea. This muscle runs more in a diagonal from the inner elbow.


Now on to the flexor carpi ulnaris.
Look through this like a flip book and you should get the idea. It is located on the “side” of the forearm, hence the fist placement.


Now on to the triceps.
Look through this like a flip book and you should get the idea.


Important section (click links to read immediately):
CHAPTER 8: TAPING THE ELBOW FOR CUBITAL TUNNEL SYNDROME OF THE ULNAR NERVE
Stretchy tapes, such as Rock Tape, Kinesiotape, KT tape, Spider Tape, and so many others, can be used to stretch the fascia around the cubital tunnel. While I was unable to find any studies that help to substantiate my claim that this is useful, I will say that throughout my career, I have found this to be an easy and effective way to emphasize movement of the ulnar nerve above and below the tunnel.
Think of the nerve as a single piece of fishing line. If the line gets stuck in one place on the reel/pole, then the glide is reduced throughout the entire line. This is the idea of a “double crush syndrome,” where the nerve can become trapped in more than one location.
Applying stretch tape to an elbow in extension and using 50% stretch will create a “tugging” sensation when it is left on for more than one day. If the skin does not become irritated, I have even left tape on for up to four days.
Some patients feel better with the tape, and then there are others that do not. Worst case scenario, the tape is easily removed and it barely costs anything. Taping is low risk and there’s potential for great reward. I find this tape job tends to help those who correlate their problem to when the elbow is bent. Here is a video on elbow taping.

My normal recommendation for how to tape this condition is to surround the path of the ulnar nerve with a criss-cross pattern. I don’t split the ends or cut them up into a bunch of pieces. I mainly focus on cleaning up the ends so that the tape will last more than a day.
Be aware that there are some tapes that are heat-activated and will therefore need a lot of rubbing over the surface of the tape in order to activate the adhesive.
If you have more questions about specific brands of tape, please visit their respective websites for more information.
Important section (click links to read immediately):
CHAPTER 9: “TAB TAPING” THE ELBOW for cubital tunnel syndrome


CHAPTER 10: SELF-MASSAGE OF THE “INNER TRICEPS” for ulnar nerve dysfunctions
I use the term “inner tricep” loosely. The intermuscular region between the tricep and the bicep (inner side) can be a region where nerves and vessels are “pinched”. You really should consider seeing a doc for this one for sure.
The bundle of nerves passes right on the inner part of the arm between the biceps and the triceps, just before it passes the elbow. This area can feel “tight” when bringing the arm over the head and while extending the elbow. This tightness is something that I have personally experienced, and I can attest that this tactic actually works for relief!
Gently, but firmly, massage the areas in front and behind the nerve with the barbell to try to free-up any restrictions of slide. This doesn’t even need to be super specific!
Think of this as constantly freeing the bristles of a paint brush as it dries. Lightly freeing-up the motion of these areas over time, can assist in ulnar nerve glide, especially if this movement is part of the issue.
If firm/deep doesn’t seem to work, I’ll typically have people go with the “light and fluffy” style. Pinching the skin and lifting can decompress the area where the nerve could be compressed within the fascial layers just beneath the skin. It should not be painful to skin roll. When it is painful, I take that as a sign that we might be on the right track.
Grab a handful of skin, pull up and shake. Movement of the shoulder, elbow and hand will assist the nerve in pulling through the area of fascia you are holding. This assists with “decompressing” the fascial channel that the nerve is running through.


This sometime provides surprising, immediate relief in those with cubital tunnel syndrome as well. If you’re a healthcare provider reading this and would like to know more about this style of skin rolling, then check out Dermal Traction Technique by Dr. Phillip Snell and Dr. Justin Dean.
CHAPTER 11: “TAB TAPE” THE TUNNEL OF GUYON (WRIST) ENTRAPMENT OF ULNAR NERVE
Heard of Handlebar Palsy? This taping technique assists in keeping the wrist clear.
This is going to be very similar to the elbow.
So, instead of boring you with the whole process, I’ll spare my fingers and your brain, and just show pictures. Remember to pull the tab into the position of comfort and lock it down. I actually have a video on this that is combined with tab taping of the elbow above.
The ulnar nerve at the Tunnel of Guyon has been documented to slide on average 13.6 mm; and in cases where people felt pain, numbness, and had loss of function of the hand, they’ve found significant decreases. Think about that–13.6 mm is a huge number!
Using the tab taping strategy, we can lift the roof of the tunnel and allow the nerve to move freely. This process happens more readily on its own if we are moving though. Movement is truly medicine in this situation. Lift the tunnel roof and slide the nerve. Simple, right?


CHAPTER 12: STRETCHING THE FOREARM for ulnar nerve slide dysfunctions
Muscles of the forearm control the wrist and the fingers. Occasionally stretching these muscles in order to attain normal, human range of motion is great, especially when excessive use is a factor. Examples of excessive use include typing, construction, factory work, massaging, etc.
Here are three stretches that I would suggest:
WRIST FLEXORS AND ELBOW PRONATORS


WRIST EXTENSORS AND ELBOW SUPINATORS


ULNAR DEVIATORS


Lastly, for those of you who like to watch videos, I made this video of all of my favorite forearm/ hand stretches to address an ulnar nerve compression in the elbow or wrist. These stretches are not a “fix all” but when they are needed, they work extremely well.
I normally suggest my patients do this circuit 10 times a day for 30 seconds per stretch, especially of they are using their arm and hand a lot.
Important section (click links to read immediately):
- Active Release Article – very effective treatment for the forearms, wrists, and hands
- Self-massage tools Amazon
CHAPTER 13: Stretching of the Hand Muscles for Ulnar Nerve Slide Dysfunctions
The hand contains muscles and tendons that can be stretches similarly to the way that Yoga Toes stretch the muscles and tendons of the feet, but the hand isn’t quite as simple as the feet. Here is a great stretch that I use personally!


I really don’t think it has a name, and it is extremely difficult to teach unless I perform it on someone in person.
When you succeed in finding the sensation that we are looking for, you will definitely know it. My suggestion is to take a look at these pictures a few times before you try it out. When you get it right, your hand is going to light up… kind of like your mouth would if you bit into a ghost pepper. Maybe not that extreme, but you get the point.
CHAPTER 14: START PLAYING in SAND… OR RICE
Playing in the sand can be an extremely beneficial, therapeutic exercise for an ulnar nerve issue in the elbow and/or hand. It is venturing toward the side of active care, but it’s extremely generic and can often help in deconditioned people.
This type of hand/wrist therapy is actually kind of fun too! Grab some kind of box (an empty shoe box works great) and fill it up with sand.
Put a bunch of small, random household items (paper clips, buttons, marbles, anything that won’t poke you really) in the sand and mix up the contents so that most of the objects need to be dug out.
Get your hand in there and start searching for the items in the sand, moving the hand around from the wrist and not from the shoulder and pull the items out one by one as you find them.
Or if you don’t mind an activity that’s less entertaining, you can get right down to it with “Rice Grabs” which work extremely well.
Here’s a video on a circuit of “Rice Grabs”:
There are a couple ways that this can help you.
First, the resistance that the sand provides for the hand and wrist as you search for the items, will help in the rehab.
Second, you may not know it, but you are actually gliding the nerve through the Tunnel of Guyon when you do this. There is a saying that we use in our field: “Movement is Medicine.” This rehab technique is a perfect example of that. This type of hand therapy is often performed at physical therapy or occupational therapy facilities with sand and small objects within the sand. The difference we suggest is with the intensity it is performed.
CHAPTER 15: START USING THE MONKEY BARS
Say what??!! Yep, go have some fun! Using the monkey bars will assist in building strength within the core, upper back, shoulders, elbows and hands all at the same time which decreases many of the reasons for ulnar nerve compression.
Sounds fun, doesn’t it? It doesn’t necessarily need to be monkey bars, but there should be some kind of hanging aspect. This suggestion is one that I don’t give people until they’ve decreased their symptoms significantly and they’ve mastered their rehab. I call them “Big Picture” movements that come around as people break free from the death grip of rehab purgatory.
I know some of you reading this might immediately think to yourself that it’s going to be impossible. I understand it can be nerve-racking to think about, but in a lot of cases of an ulnar nerve compression, the upper limbs need to be strengthened!
Hanging is one of the best ways to start that strengthening process. Hanging requires strength from the hand, arm, elbow, shoulder, shoulder blade, AND spine. There is a huge amount of contraction required when hanging from a bar, especially when engaging the core and legs.
Something most people don’t think about is that the ulnar nerve is actually sliding as we swing. Pretty cool, huh?! As you start to move through your education about the ulnar nerve and how to keep it healthy, you’ll see that rehab and being active in life are not really all that different. They are just progressions and regressions of each other.
How would I do it?
Like this:
FIRST: Step up to meet whatever bar you are using, that is able to support your weight (be careful using in-door types of pull-up bars since they are not always secure). Grip the bar fully with the hands, hold on, and allow the weight to fully hang down, stepping off whatever you might have used to step up to the bar.
SECOND: Try to pull the bar towards you without bending the elbows. This will help to engage your shoulders and arms.
THIRD: Now, point your toes about 2-inches in front of you. Point the toes with some gusto. Think of a hunting dog pointing in the direction of the game for the hunter.
FOURTH: Hold this position for as long as you can. Over time, you should try to increase the duration of the hang.

CHAPTER 16: START RESISTANCE TRAINING
Weight training can assist in building total body strength & torso endurance as a whole, along with reducing symptoms of an ulnar nerve compression. I know sounds scary to some of you, but read on for all of the reasons why it’s important…
For a lot of you, this may not be the answer you were hoping to hear, but to be very honest, this is probably the most valuable and most important suggestion contained in this article. Resistance training doesn’t have to be extreme, rather just consistent exposure to moderate weights. Your body, as a whole, will thank you for the exposure. It’s kind of like keeping a weekly date night…it just works! This is where I start to get more into “Big Picture” motions again. We cover it briefly in the ebook, but it will be a separate book (or course) to come for sure.
A lot of the suggestions I have made here are ones for “pain management”. What makes this suggestion so much more significant than the others is that it has the power to stop the ulnar nerve symptoms from ever coming back!
Sure, I acknowledge that there are some cases of ulnar nerve entrapment that can occur on a person who does resistance training, BUT these cases are pretty rare. Those who choose to not strengthen their bodies, will see their bodies degrade at a much more rapid pace as they age, and they will encounter more nerve compression over time.
Interested now?
If yes, you are probably wondering where to even begin. The various other suggestions that I’ve made above are a great place to start! Blowing up a balloon, hanging on the monkey bars, engaging the upper back, or just cut through all of the wondering and buy the eBook. It’s the best bang for buck, and it’s more insight than you’ll ever going get anywhere else on the topic of how a rehab doc implements active care for the ulnar nerve. For the cost of one copay, you’ll know more than you ever wanted to.


A RECAP
Now that we have covered some of today’s best ulnar nerve passive therapies, it’s time to consider the possibility of ulnar nerve pain being present on both sides. What do you do if the pain is in both arms/hands?
If this sounds like you, then there is a strong possibility that the cause resides in the spine and/or upward. While the chances of having compressions on both sides that are equal in nature and intensity is very rare, you should seek care and an opinion from a doctor if these types of symptoms are present.
I’d love to say that everything I just wrote about will help everyone, but I know for a fact that the lay public are typically bad at self-diagnosis. I conducted a study on the accuracy of the public’s self-diagnostic skills, and found that they were correct less than 50% of the time. My study was conducted with a simple plot line: could runners self-diagnose when they had Achilles Tendonitis? Since nerve conditions are much more complex than Achilles Tendonitis, I’d guess someone’s self-diagnostic accuracy to probably be closer to less than 5%.
I don’t say this to be a pessimist. I’m simply a realist. Get yourself examined. It will probably be around $100 to $500 (depending on your part of the country), and know for sure what you’re working with. Have your doc go over this document with you. With a little help and hard work, this “pain in the ass” condition can often go away.
Remember that although some things can seem like quick fixes, they are usually really just bandaids.
Diagnosis — Passive Care — Active Care — “Big Picture” Motions.
Thanks for reading.
Dr. Sebastian Gonzales DC, DACBSP®, CSCS
More About Active Care
Active care teaches your body to work as intended so the numbness doesn’t come back. There are a series of tests and movements one must do to achieve success with active care so that the hand numbness goes away for good. This is the treatment I provide to my patients for hundreds of dollars, depending on how many sessions they need.
I’ve since created a web-based guide that goes over my active care process in detail so you can fix yourself if you don’t have access to a sports chiropractor near you. It’s affordable, and effective as noted by some. of our. 5 star reviews. Check out the product page below.
The most valuable resource on the internet for hand numbness.
Just take a look at these real reviews and how quickly some of them felt relief.
Nitesh Goel

5 out of 5 stars!
I think this guide may be the reason I don’t need to get a surgery for my ulnar nerve compression.
I had been dealing with pinky finger pain and numbness for weeks. I sought a lot of professional help, including seeing doctors at some well known hospitals. But their prescription of resting, icing, stretching, and a fistful of Advils did little to reduce my pain.
Literally the first two movements in the guide brought me relief. It was pretty shocking for me just how well they understood what I was going through. I have been following the guidelines for a few weeks. I’m making tremendous progress towards recovery.
The guide’s well written and easy to follow. Sebastian and Dawne have a talent for explaining exercises using cues from everyday movements we do anyway. It makes it easy to do them right without supervision.
The instructions are also funny sometimes, which I enjoyed. Though, I would like to talk to Sebastian at some point about his vocal disdain for the metric system.
Alec
5 out of 5 stars!
Amazing product!! I first couldn’t believe how efficient the exercises in this product are. In one package deal, I learned about the essence of my issue, learned how to mitigate my symptoms and how to reduce the likelihood that they reoccur altogether. The content is delivered in a way so that I was easy for me to understand the information, that would have otherwise been to complex for me.
I strongly encourage people to give this product a shot for I believe it has a great potential to help people dealing with hand numbness, as I used to. That’s pretty much it, I don’t know of anything similar. To me, it is a no-brainer! [Read Full Review]
Amanda Latona
5 out of 5 stars!
Thank you for creating this content for hand numbness. I purchased it 5 months postpartum. I started to feel numbness in the ring and pinky finger, but a lot of things were also aching in my upper body. I was really interested in elbow pain, but came across this guide. I did a few of the exercises and within a week, I didn’t feel the pain come back. It would come and go, but now it’s gone. I am now almost 1yr postpartum and I haven’t experienced any numbness. [Read Full Review]